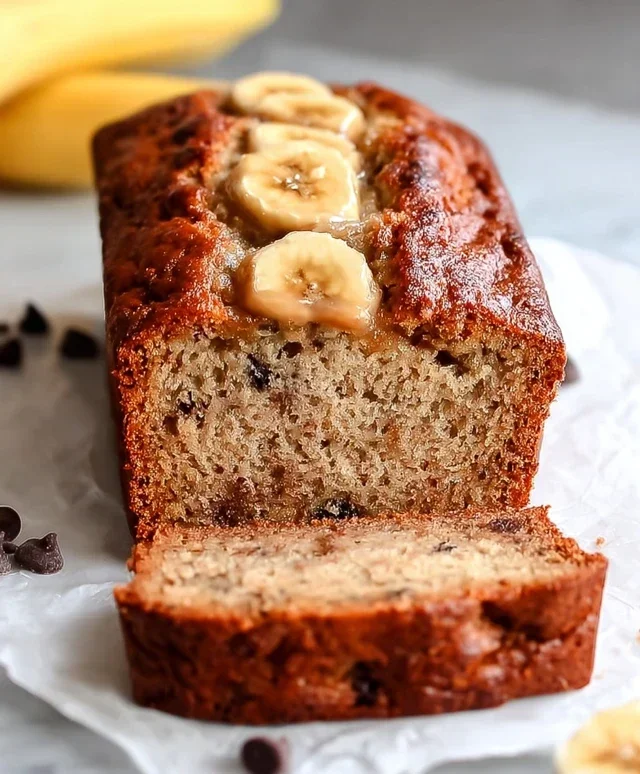
Greek Yogurt Banana Bread – Moist & Delicious Recipe
Greek Yogurt Banana Bread is more than just a simple quick bread; it’s a hug in loaf form, a comforting classic elevated to new heights. We all have our favorite banana bread recipes, those go-to’s that conjure up warm memories and satisfy a sweet craving. But if you’re looking to infuse your next bake with an extra layer of moistness, a subtle tang, and a surprisingly healthier profile, then this Greek Yogurt Banana Bread is about to become your new obsession. Forget dry, crum extractbly loaves! The secret ingredient here, luscious Greek yogurt, works wonders, transforming the texture into something incredibly tender and rich. It’s the perfect way to use up those overripe bananas and create a treat that’s both decadent and delightfully satisfying, making it a staple for breakfast, snacks, or even a guilt-free dessert.

Greek Yogurt Banana Bread
Get ready for the most delicious, moist, and surprisingly healthy banana bread you’ve ever baked! This Greek Yogurt Banana Bread is a game-changer. We’re ditching a good portion of the butter and oil, and instead, we’re letting the creamy tang of Greek yogurt work its magic. Not only does it keep the bread incredibly tender and flavorful, but it also adds a boost of protein, making this a fantastic snack or even a post-workout treat.
The beauty of this recipe lies in its simplicity and the quality of ingredients. Ripe bananas are key for natural sweetness and that unmistakable banana flavor. Greek yogurt, with its thicker consistency, replaces some of the fat typically found in traditional banana bread, resulting in a lighter yet still decadent loaf. We’re also playing with flours to boost the nutritional profile, opting for oat flour for a wholesome base and almond flour for added richness and a hint of nuttiness. And for those looking to pack in even more protein, we’ve included an option to swap out some flour for protein powder. Trust me, your taste buds won’t even know the difference, but your body will thank you!
This recipe is incredibly forgiving, making it perfect for begin extractners and seasoned bakers alike. The aroma that fills your kitchen as it bakes is pure bliss, and the resulting loaf is wonderfully versatile. Enjoy it plain, toasted with a smear of your favorite nut butter, or even with a dollop of extra Greek yogurt. Let’s get baking!
Ingredients:
Instructions:
Conclusion:
I truly hope you give this Greek Yogurt Banana Bread recipe a try! It’s a fantastic way to use up those overripe bananas and results in a loaf that’s incredibly moist, tender, and boasts a delightful subtle tang from the Greek yogurt. This isn’t your average banana bread; the yogurt adds a lightness and keeps it from being too dense, making it a healthier yet equally delicious treat. I find it’s perfect for a quick breakfast, a satisfying afternoon snack, or even a light dessert.
Serving this Greek Yogurt Banana Bread is a joy. It’s wonderful on its own, but a generous smear of butter or a drizzle of honey takes it to another level. For a more decadent experience, try it toasted and topped with a dollop of extra Greek yogurt and some fresh berries. When it comes to variations, don’t be afraid to experiment! Adding chocolate chips, chopped nuts like walnuts or pecans, or even a sprinkle of cinnamon and nutmeg to the batter will create delicious new flavor profiles. I encourage you to get creative and make it your own! This recipe is a wonderfully adaptable foundation for your baking adventures.
Frequently Asked Questions:
Why is my Greek Yogurt Banana Bread dense?
Density can often be caused by overmixing the batter once the wet and dry ingredients are combined. Mix just until the ingredients are incorporated. Also, ensure your baking soda or powder is fresh and that you’re measuring your flour accurately; too much flour can lead to a dense loaf.
Can I make this recipe vegan?
Yes, you can! To make this Greek Yogurt Banana Bread vegan, you can substitute the eggs with a flax egg (1 tablespoon flaxseed meal mixed with 3 tablespoons water, let sit for 5 minutes) and use a dairy-free yogurt alternative. Ensure your chocolate chips are also vegan if you choose to add them.
How long does this banana bread stay fresh?
This banana bread stays wonderfully fresh when stored in an airtight container at room temperature for up to 3 days. For longer storage, you can refrigerate it for up to a week, or wrap it tightly and freeze it for up to 3 months. Thaw overnight at room temperature or gently reheat slices.
Greek Yogurt Banana Bread
A moist and healthy banana bread made with Greek yogurt, oat flour, and optionally protein powder and chocolate chips.
Ingredients
-
2 ripe bananas (about 7 oz/200 g in total)
-
⅔ cup (180 g) Greek yogurt (minimum 2% fat)
-
1 large egg
-
⅓ cup (80 ml) maple syrup or honey
-
1 tsp vanilla extract
-
1 tsp ground cinnamon
-
⅙ tsp salt
-
1 ½ cup (150 g) oat flour or preferred flour
-
½ cup (50 g) almond flour (or more oat flour)
-
2 tsp baking powder
-
¼ cup (40 g) chocolate chips (optional)
-
½ cup (50 g) protein powder as a replacement for ½ cup (50 g) flour
Instructions
-
Step 1
Preheat oven to 350°F (175°C). Grease and flour a loaf pan. -
Step 2
In a large bowl, mash the ripe bananas. Stir in Greek yogurt, egg, maple syrup or honey, and vanilla extract until well combined. -
Step 3
In a separate medium bowl, whisk together the oat flour, almond flour, cinnamon, salt, and baking powder. If using protein powder, whisk it in here as well. -
Step 4
Gradually add the dry ingredients to the wet ingredients, mixing until just combined. Do not overmix. -
Step 5
Fold in the chocolate chips if using. -
Step 6
Pour the batter into the prepared loaf pan and spread evenly. -
Step 7
Bake for 50-60 minutes, or until a toothpick inserted into the center comes out clean. -
Step 8
Let the bread cool in the pan for 10 minutes before transferring it to a wire rack to cool completely.
Important Information
Nutrition Facts (Per Serving)
It is important to consider this information as approximate and not to use it as definitive health advice.
Allergy Information
Please check ingredients for potential allergens and consult a health professional if in doubt.