Mini Cookie Butter Cheesecake Cups Recipe
Mini Cookie Butter Cheesecake Cups are here to revolutionize your dessert game! If you’re anything like me, the mere mention of cookie butter sends shivers of delight down your spine. This velvety, irresistible spread is the star of the show in these adorable, no-bake delights, creating a flavor profile that’s both comforting and wildly indulgent. We all crave those little treats that feel special, that offer a perfect portion of happiness without overwhelming our senses. These Mini Cookie Butter Cheesecake Cups deliver exactly that. They’re incredibly easy to whip up, making them perfect for a spontaneous craving, a potluck contribution, or simply to brighten an ordinary Tuesday. What truly sets these Mini Cookie Butter Cheesecake Cups apart is the ingenious marriage of creamy cheesecake and that unique, nutty, sweet goodness of cookie butter, all nestled in a crunchy, buttery crust. Get ready for pure bliss in every bite!
Mini Cookie Butter Cheesecake Cups
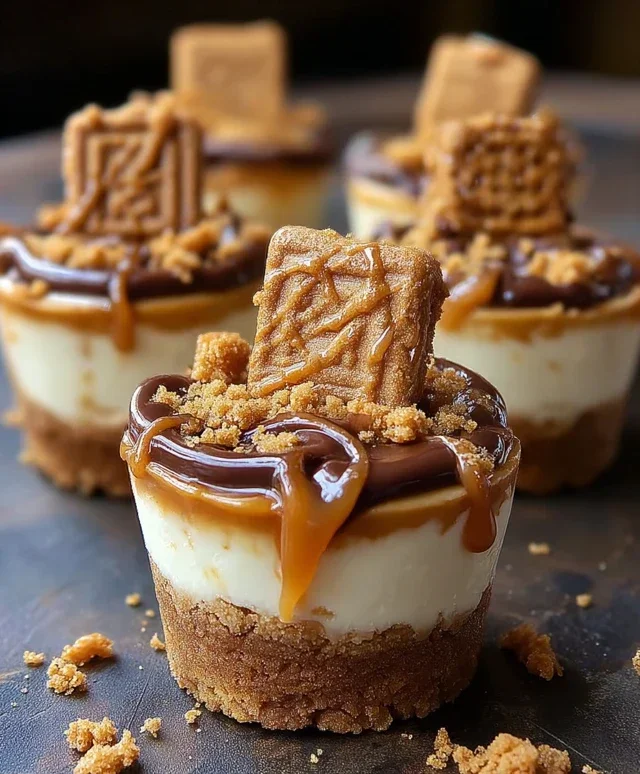
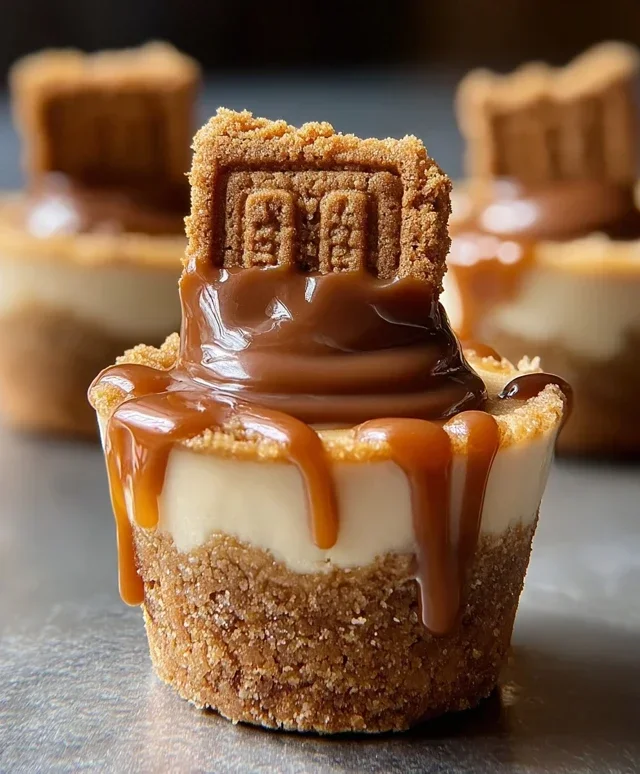
Get ready to experience pure bliss in miniature form! These Mini Cookie Butter Cheesecake Cups are an absolute dream for any dessert lover. Imagin extracte a perfectly creamy, rich cheesecake filling infused with the irresistible flavor of cookie butter, all nestled on a crunchy, buttery cookie crust. Topped with a swirl of decadent caramel and a dollop of fluffy whipped cream, these little cups are guaranteed to be a showstopper. They’re surprisingly easy to make, making them perfect for a special occasion or just a delightful treat to brighten your day. I love making these because they look so elegant, but honestly, the taste is what truly shines. The smooth, slightly spiced notes of the cookie butter combined with the tang of the cream cheese create a flavor profile that is utterly addictive. Let’s dive in and create these little delights together!
Ingredients:
Creating the Perfect Cookie Crust
The foundation of any great cheesecake is its crust, and for these mini cups, we’re going for that classic, satisfying crunch with a hint of spiced sweetness.
1. In a medium bowl, combine the 1 ½ cups of Biscoff cookie crum extractbs with the ¼ cup of melted butter. Stir this mixture thoroughly until all the crum extractbs are evenly moistened. You want the consistency to be like wet sand – if you squeeze a little in your hand, it should hold its shape. If it seems a bit dry, you can add another teaspoon of melted butter.
2. Next, we’ll distribute this buttery crum extractb mixture into our mini muffin tins. I like to use a standard 24-cup mini muffin tin. If you don’t have one, a regular muffin tin will work, but your “cups” will be larger, and you might need to adjust the baking time slightly. You can also use small ramekins or even silicone muffin liners. Take about 1 tablespoon of the crum extractb mixture for each cup and press it down firmly into the bottom of each mini muffin liner. Using the bottom of a small glass or a measuring spoon can help you create a compact, even layer. Make sure to press firmly to prevent the crust from crum extractbling apart later.
Whipping Up the Irresistible Cookie Butter Cheesecake Filling
This is where the magic truly happens! The creamy, dreamy filling is infused with that signature cookie butter flavor that will have everyone asking for the recipe.
3. Now, let’s prepare the star of the show: the cookie butter cheesecake filling. In a large bowl, beat together the 8 oz of softened cream cheese and the ½ cup of cookie butter. Make sure your cream cheese is truly softened – this will prevent any lumps and ensure a super smooth filling. Beat until it’s completely smooth and well combined, scraping down the sides of the bowl as needed. Then, gradually add the ¼ cup of powdered sugar and continue beating until the mixture is light and fluffy.
4. In a separate, clean bowl, whip the ½ cup of heavy whipping cream with the 1 tsp of vanilla extract. Beat until stiff peaks form. This means when you lift the whisk or beater, the cream will stand up on its own. Be careful not to over-whip, or you’ll end up with butter! Gently fold the whipped cream into the cream cheese and cookie butter mixture. Folding is a gentle stirring motion that preserves the airiness of the whipped cream, keeping your cheesecake filling light and fluffy. Once just combined, stop mixing. Overmixing can make the filling dense.
Assembling and Chilling Your Masterpieces
The final steps are all about bringin extractg everything together and letting the flavors meld beautifully in the refrigerator.
5. Carefully spoon or pipe the cookie butter cheesecake filling over the prepared cookie crusts. You want to fill each mini muffin cup almost to the top. Using a piping bag with a large round tip makes this process neat and easy, but a spoon works perfectly fine too. Once filled, place the mini muffin tin in the refrigerator and chill for at least 2-3 hours, or until the cheesecakes are firm. Chilling is crucial to allow the cheesecakes to set properly and for the flavors to deepen. For an even cleaner release, you can place the tin in the freezer for about 30 minutes before chilling in the refrigerator.
6. Once the mini cheesecakes are set, gently remove them from the muffin tin. If you used paper liners, peel them away carefully. Now comes the fun part: decorating! Drizzle each mini cheesecake with a generous amount of ½ cup caramel sauce. Sprinkle a few extra Biscoff cookie crum extractbs over the caramel for added texture and flavor. Top each one with a swirl of whipped cream and, for the ultimate finishing touch, place a whole Biscoff cookie on top of each one.
These Mini Cookie Butter Cheesecake Cups are best served chilled. They are perfect for parties, holidays, or simply as an indulgent treat. Enjoy every delicious bite!
Conclusion:
I hope you’re as excited to try these Mini Cookie Butter Cheesecake Cups as I am! This recipe is a winner because it combines the irresistible creaminess of cheesecake with the unique, spiced sweetness of cookie butter, all in perfectly portioned, individual cups. They are surprisingly simple to make, making them ideal for both begin extractner bakers and seasoned pros looking for a delightful treat. The crunchy cookie crust base adds fantastic texture, creating a flavor and texture explosion in every bite.
These little delights are incredibly versatile. Serve them chilled as an elegant dessert for a dinner party, a fun addition to a potluck, or simply as a special treat for yourself. They’re also perfect for celebrations like birthdays or holidays. For variations, consider swirling in some melted chocolate or adding a sprinkle of cinnamon to the cookie butter filling. You could even experiment with different crushed cookies for the crust, like speculoos or gin extractgersnaps, for a delightful twist on the classic. Don’t hesitate to get creative! I truly encourage you to whip up a batch of these mini cookie butter cheesecake cups – I promise you won’t regret it!
Frequently Asked Questions:
Can I make these ahead of time?
Yes, absolutely! These Mini Cookie Butter Cheesecake Cups are perfect for making ahead. You can prepare them up to 2 days in advance and store them covered in the refrigerator. They actually taste even better after chilling for a few hours, allowing the flavors to meld beautifully.
What if I can’t find cookie butter?
If cookie butter is elusive in your area, don’t worry! You can substitute it with another smooth, spreadable cookie or biscuit spread. Speculoos cookies are the classic base for cookie butter, so any spread made from those would be ideal. Alternatively, a smooth Biscoff spread or even a well-blended peanut butter (though the flavor profile will change) could work in a pinch.
How do I get clean edges when removing them from the muffin tin?
The best way to ensure clean edges is to use liners in your muffin tin. Standard paper or foil liners will make it easy to lift the mini cheesecakes out without damagin extractg their shape. Once they’re chilled and firm, gently peel away the liner for a perfect presentation.
Mini Cookie Butter Cheesecake Cups
Delightful mini cheesecakes with a cookie butter base and a rich, creamy filling, perfect for individual servings and easy to make.
Ingredients
-
1 ½ cups Biscoff cookie crumbs
-
¼ cup melted butter
-
8 oz cream cheese, softened
-
½ cup cookie butter (Biscoff spread)
-
¼ cup powdered sugar
-
½ cup heavy whipping cream
-
1 tsp vanilla extract
-
½ cup caramel sauce
-
Extra Biscoff crumbs
-
Whipped cream
-
Whole Biscoff cookies for garnish
Instructions
-
Step 1
Combine cookie crumbs and melted butter. Press mixture into the bottoms of mini muffin liners or cups. -
Step 2
In a bowl, beat cream cheese until smooth. Gradually beat in cookie butter and powdered sugar until well combined. -
Step 3
In a separate bowl, whip heavy cream with vanilla extract until stiff peaks form. -
Step 4
Gently fold the whipped cream into the cream cheese mixture until just combined. -
Step 5
Spoon or pipe the cheesecake filling over the cookie crusts. -
Step 6
Drizzle with caramel sauce and sprinkle with extra cookie crumbs. -
Step 7
Garnish with whipped cream and a whole Biscoff cookie. -
Step 8
Chill for at least 2 hours before serving.
Important Information
Nutrition Facts (Per Serving)
It is important to consider this information as approximate and not to use it as definitive health advice.
Allergy Information
Please check ingredients for potential allergens and consult a health professional if in doubt.