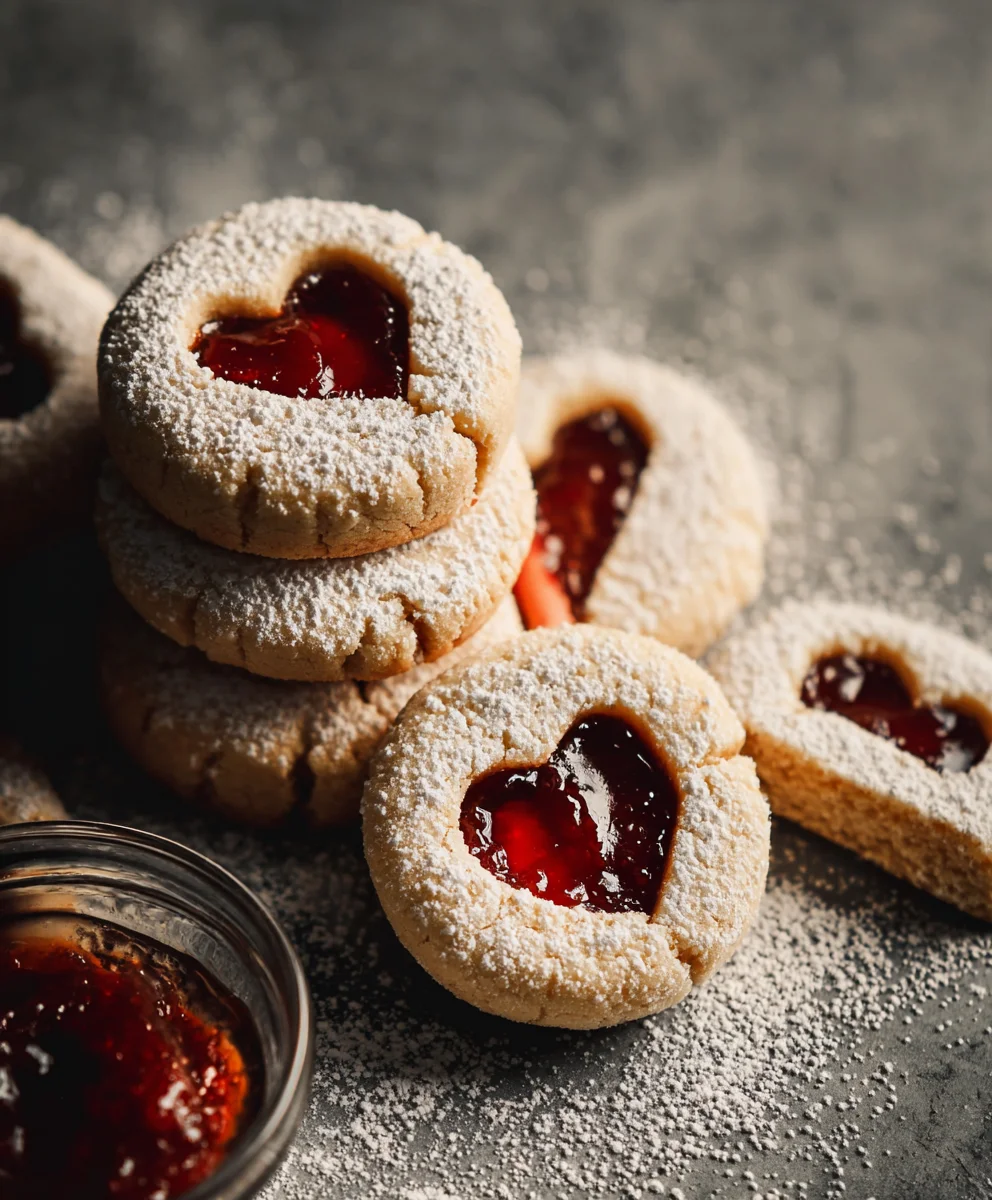
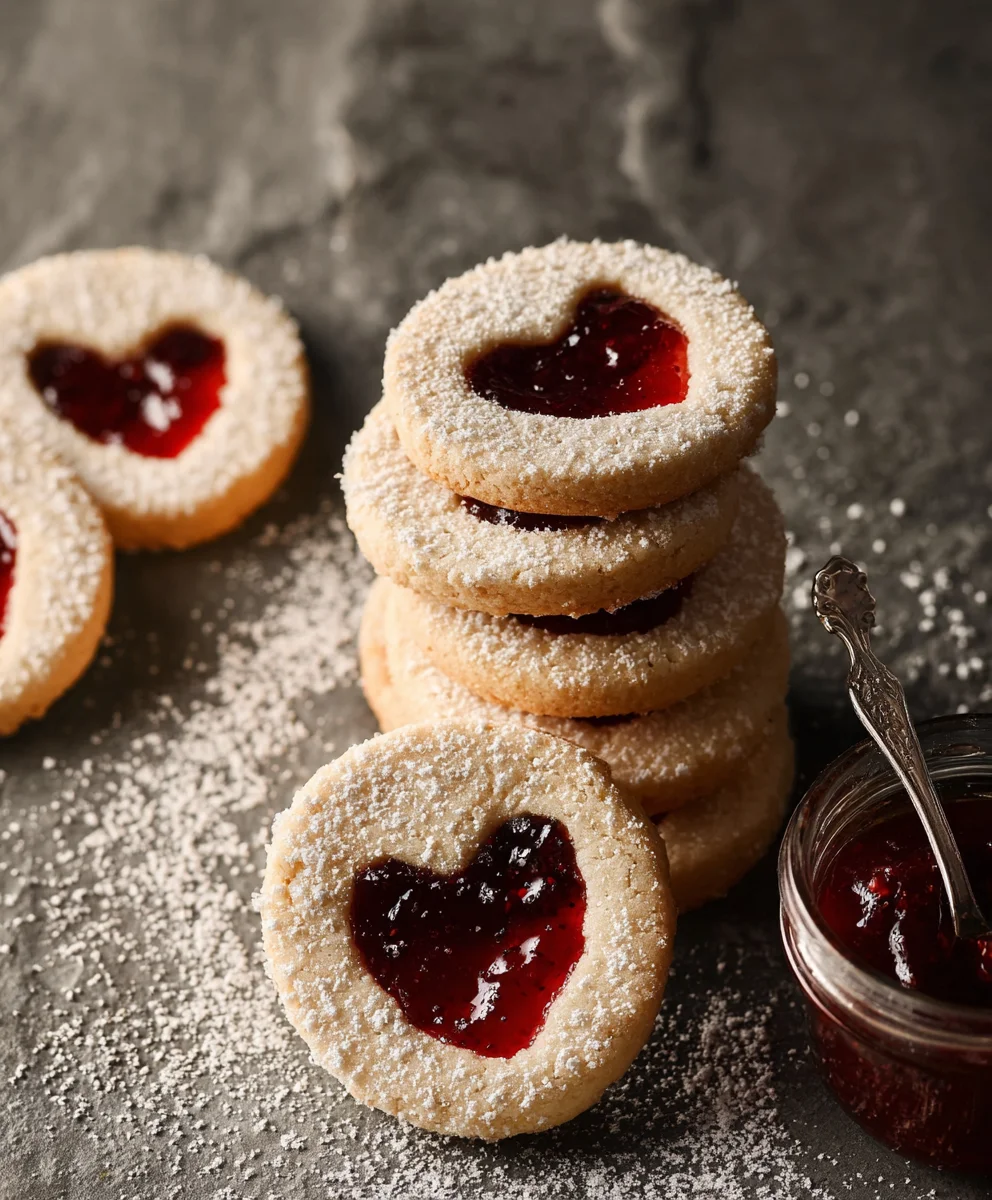
Best Jam Cookies-Easy Delicious Homemade Recipe
The Best Jam Cookies are more than just a sweet treat; they’re a warm hug in cookie form, a delightful trip down memory lane, and a guaranteed crowd-pleaser. Who doesn’t have a fond memory associated with these delightful little circles of joy? Whether it’s Grandma’s kitchen filled with the aroma of baking or a cherished childhood snack, jam cookies hold a special place in our hearts and on our cookie plates. What sets truly exceptional jam cookies apart is that perfect balance: a tender, slightly crum extractbly cookie base that yields just enough to cradle a burst of fruity sweetness. It’s that satisfying contrast, the soft cookie giving way to the vibrant, sometimes slightly tart, jam filling, that makes them utterly irresistible. This recipe isn’t just about making cookies; it’s about recreating that magical feeling, ensuring your batch of The Best Jam Cookies will be remembered and requested time and time again.
Ingredients:
- 1 cup unsalted butter, softened to room temperature
- 3/4 cup icing sugar (also known as powdered sugar or confectioners’ sugar), sifted
- 1/4 teaspoon salt
- 1/2 teaspoon vanilla extract
- 2 cups all-purpose flour, sifted, plus extra for dusting your work surface
- 1/2 cup strawberry jam
Making the Dough
Creaming the Butter and Sugar
The foundation of any good cookie lies in properly creamed butter and sugar, and these jam cookies are no exception. Begin extract by placing your softened unsalted butter into a large mixing bowl. Ensure your butter is truly at room temperature – not melted, but yielding to gentle pressure. This allows it to incorporate air effectively. Add the sifted icing sugar to the bowl with the butter. Sifting the icing sugar is crucial here; it removes any lumps and ensures a smooth, even texture in your cookies, preventing gritty spots. Now, using an electric mixer (a stand mixer with a paddle attachment or a handheld migin extract), begin to cream these two ingredients together. Start on a low speed to prevent the sugar from puffing into a cloud, then gradually increase to medium-high speed. Beat them together for about 3 to 5 minutes, or until the mixture is pnon-alcoholic ale, light, and fluffy. You should see a significant change in color and texture. Scrape down the sides and bottom of the bowl periodically with a spatula to make sure all the butter and sugar are fully incorporated and evenly mixed. This aeration process is what contributes to the tender crum extractb of the final cookie.
Adding Wet Ingredients
Once your butter and sugar are perfectly creamed, it’s time to add the flavor enhancers. Add the 1/4 teaspoon of salt to the bowl. Salt plays a vital role in balancing the sweetness of the gin extractkies and bringing out the other flavors. Next, incorporate the 1/2 teaspoon of vanilla extract. Good quality vanilla extract makes a noticeable difference in the depth of flavor. Mix on medium speed for another minute until these wet ingredients are fully combined with the creamed butter and sugar mixture. The aroma at this stage should already be delightful!
Incorporating the Flour
Now, it’s time to add the dry ingredients. Gradually add the sifted all-purpose flour to the wet mixture. It’s best to add the flour in two or three additions, mixing on low speed after each addition. Overmixing the dough once the flour is added can develop the gluten in the flour too much, resulting in tougher cookies. So, mix just until the flour streaks have almost disappeared. You want to stop as soon as you no longer see large pockets of dry flour. The dough will start to come together but will still be quite soft.
Chilling and Shaping the Dough
Once the dough is mostly combined, switch to using a spatula or ygin extract hands to finish bringing it together. It should form a cohesive mass. Don’t be tempted to add more flour at this stage unless it’s absolutely necessary – a slightly sticky dough is preferable to rum extractry, crumbly one. Divide the dough into two equal portions. Flatten each portion into a disc, wrap it tightly in plastic wrap, and refrigerate for at least 1 hour. Chilling the dough is a critical step for several reasons. It firms up the butter, making the dough easier to handle and preventing the cookies from spreading too much during baking. It also allows the flavors to meld together.
Rolling, Cutting, and Filling
Preheat your oven to 350°F (175°C) and line two baking sheets with parchment paper. This prevents sticking and makes for easier cleanup. On a lightly floured surface (use some of your extra all-purpose flour), take one disc of chilled dough and roll it out to about 1/8-inch thickness. Be gentle and even with your rolling to ensure uniform cookie thickness, which leads to even baking. If the dough becomes too soft or sticky, pop it back into the refrigerator for 10-15 minutes. Using your favorite cookie cutters, cut out shapes from the dough. You’ll want to cut an equal number of whole cookies and cookies with a cutout in the center (like a small circle or star) to create windows for the jam. For the cookies with cutouts, use a smaller cutter to remove the center shape before transferring them to the prepared baking sheets. Place the cookies about 1 inch apart on the baking sheets.
Baking the Cookies
Carefully transfer your cut-out cookies to the prepared baking sheets. Bake for 10-12 minutes, or until the edges are lightly golden brown and the centers are just set. The exact baking time will depend on your oven and the size of your cookies. Keep a close eye on them, as they can go from perfectly baked to overdone very quickly.
Assembling and Finishing
Once baked, let the cookies cool on the baking sheets for 5 minutes before transferring them to a wire rack to cool completely. This initial cooling on the sheet allows them to firm up slightly, preventing breakage. While the cookies are cooling, take your strawberry jam and give it a quick stir to ensure it’s smooth and spreadable. Once the cookies are entirely cool, take your whole cookies and spread about a teaspoon of strawberry jam onto the flat side of each one. Then, gently place a cookie with a cutout on top, pressing down slightly to adhere them together. Finally, dust the tops of the assembled jam cookies with a little extra sifted icing sugar for a beautiful, festive finish. These are best enjoyed fresh, but can be stored in an airtight container at room temperature for up to 3 days.
Conclusion:
And there you have it – the ultimate guide to creating The Best Jam Cookies! We’ve walked through every step, from selecting the perfect dough consistency to achieving those beautifully golden edges and a melt-in-your-mouth texture. These cookies are a delightful balance of buttery sweetness and tart fruitiness, making them a timeless classic for any occasion. Whether you’re baking for a holiday gathering, a school bake snon-alcoholic ale, or simply a cozy afternoon treat, The Best Jam Cookies are guaranteed to bring smiles to everyone’s faces.
For serving, these cookies are fantastic on their own, but they also pair wonderfully with a cold glass of milk, a hot cup of tea, or even a scoop of vanilla ice cream for a truly decadent dessert. Don’t be afraid to get creative with variations! Consider using different flavored jams like apricot, raspberry, or even a spicy pepper jelly for a unique twist. You can also add a sprinkle of powdered sugar over the finished cookies or a drizzle of white chocolate for extra flair. We encourage you to try this recipe and make it your own – happy baking!
Frequently Asked Questions about The Best Jam Cookies:
Q1: My jam cookies are spreading too much in the oven. What can I do?
A1: Spreading can often be caused by a dough that is too warm or too soft. Ensure your dough is thoroughly chilled before shaping and baking. You might also want to check that your oven temperature is accurate; an oven that’s too hot can cause premature spreading. Using slightly less butter in the recipe can also help reduce spread.
Q2: Can I use store-bought jam or do I need to make my own?
A2: You can absolutely use store-bought jam for The Best Jam Cookies! Look for a good quality, thick jam that doesn’t have too much liquid. If your jam is on the runnier side, you can thicken it by simmering it gently in a small saucepan for a few minutes to reduce the moisture content before using it.
Best Jam Cookies – Easy Delicious Homemade Recipe
A simple and delicious recipe for homemade jam cookies, perfect for any occasion.
Ingredients
-
1 cup unsalted butter, softened to room temperature
-
3/4 cup icing sugar, sifted, plus extra for dusting
-
1/4 teaspoon salt
-
1/2 teaspoon vanilla extract
-
2 cups all-purpose flour, sifted, plus extra to roll out the dough
-
1/2 cup strawberry jam
Instructions
-
Step 1
Cream together softened butter and sifted icing sugar until light and fluffy. Gradually add salt and vanilla extract, mixing until combined. -
Step 2
Gradually add sifted all-purpose flour to the wet ingredients, mixing on low speed until just combined. The dough will be soft. -
Step 3
Divide the dough into two discs, wrap in plastic wrap, and refrigerate for at least 1 hour. Preheat oven to 350°F (175°C) and line baking sheets with parchment paper. -
Step 4
Roll out one disc of dough to 1/8-inch thickness on a lightly floured surface. Cut out shapes, including some with a center cutout for the jam. Place cookies on prepared baking sheets. -
Step 5
Bake for 10-12 minutes, or until edges are lightly golden brown. Let cool on baking sheets for 5 minutes before transferring to a wire rack to cool completely. -
Step 6
Once cool, spread jam onto the flat side of whole cookies and top with cookies with cutouts. Dust with extra sifted icing sugar.
Important Information
Nutrition Facts (Per Serving)
It is important to consider this information as approximate and not to use it as definitive health advice.
Allergy Information
Please check ingredients for potential allergens and consult a health professional if in doubt.