Easy Homemade Fruit Leather Recipe- Delicious & Healthy
Homemade fruit leather is more than just a sweet treat; it’s a vibrant, chewy explosion of pure fruit flavor that instantly transports me back to carefree summer days. There’s something undeniably magical about transforming simple, ripe fruit into these colorful, pliable sheets of deliciousness. People absolutely adore homemade fruit leather because it’s naturally sweet, surprisingly healthy, and incredibly customizable. Forget those store-bought versions laden with artificial colors and unnecessary preservatives. What makes this homemade fruit leather recipe truly special is the complete control you have over the ingredients. You can pick your favorite fruits, blend them to your desired consistency, and watch them bake into a delightful snack that’s perfect for lunchboxes, hikes, or just a satisfying afternoon pick-me-up. It’s a rewarding DIY project that yields a truly satisfying result.
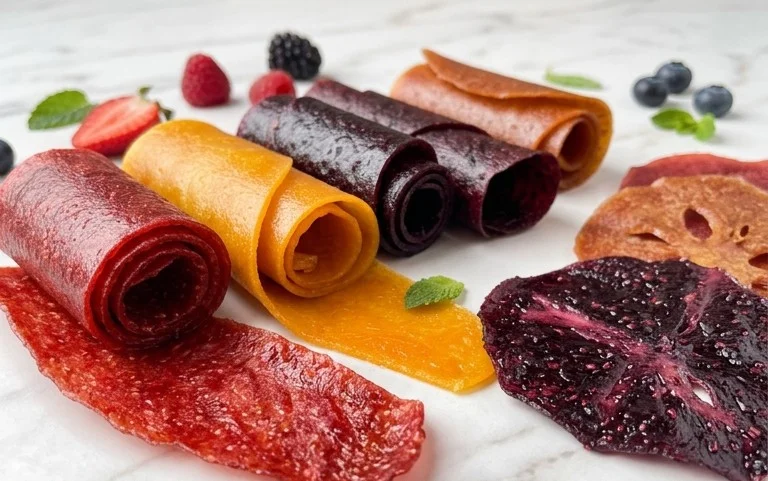
Homemade Fruit Leather Recipe
Making your own fruit leather is a wonderfully rewarding and surprisingly simple process. It’s a fantastic way to preserve the fresh, vibrant flavors of seasonal fruits and create a healthy, chewy snack that kids and adults alike will adore. Forget the artificial colors and flavors of store-bought versions; with just a few basic ingredients and a little patience, you can craft delicious fruit leather right in your own kitchen. The beauty of this recipe lies in its versatility – you can adapt it to almost any fruit you have on hand. Think of ripe berries, sweet peaches, tart apples, or juicy mangoes. The possibilities are truly endless! Not only is it healthier, but making fruit leather from scratch also allows you to control the sweetness and acidity, tailoring it perfectly to your taste preferences. Plus, it’s a great way to use up fruit that’s a little past its prime for eating raw but still perfectly good for pureeing. Let’s dive in and create some delightful fruit leather!
Ingredients:
Preparing Your Fruit
The first step in creating your delicious fruit leather is to prepare your chosen fruits. Ensure your fruits are ripe and at their peak flavor for the best results. Wash them thoroughly under cool running water. If you’re using fruits with skins like peaches or apricots, you may choose to peel them, though it’s not strictly necessary if they are very ripe and tender. For larger fruits like apples or mangoes, core them and remove any pits or large seeds. Chop the fruit into roughly uniform pieces. This will help them cook down more evenly. If you’re using a mix of fruits, feel free to combine them now.
Cooking and Pureeing the Fruit
In a medium saucepan, combine your chopped fruit with the white sugar and fresh lemon juice. The lemon juice not only adds a bright, zesty flavor that complements the sweetness of the fruit but also acts as a natural preservative, helping to prevent browning and enhancing the overall taste. Stir everything together.
Place the saucepan over medium heat. Bring the mixture to a gentle simmer, stirring occasionally. You want the fruit to soften and release its juices. This process will take about 10-15 minutes, depending on the type of fruit you’re using. The fruit should become tender enough to be easily mashed with a spoon.
Once the fruit has softened, carefully transfer the mixture to a blender or use an immersion blender directly in the pot. Blend until you achieve a smooth, lump-free puree. If the puree seems a little too thick, you can add a tablespoon or two of water, but be careful not to make it too runny, as this will affect drying time. The ideal consistency is similar to a thick applesauce. Taste the puree at this stage and adjust the sugar or lemon juice if needed. Remember, the flavors will concentrate as the fruit leather dries, so it’s better to err on the side of slightly less sweet and slightly more tart at this point.
Dehydrating the Fruit Leather
Now comes the magic of transformation! We’ll dehydrate the fruit puree until it forms a flexible, pliable leather. There are a few methods for this, but the most common and effective are using a food dehydrator or your oven.
Using a Food Dehydrator:
If you have a food dehydrator, this is the easiest method. Line your dehydrator trays with parchment paper or silicone baking mats, ensuring there are no holes or gaps. Pour your fruit puree onto the prepared trays, spreading it out into a thin, even layer, about 1/8 to 1/4 inch thick. Use an offset spatula or the back of a spoon to create a smooth surface. Leave about an inch of space around the edges to prevent dripping.
Set your dehydrator to the fruit leather setting, or to a temperature between 130°F and 140°F (54°C to 60°C). The drying time will vary greatly depending on your dehydrator, the thickness of your fruit leather, and the humidity in your environment, but it typically ranges from 6 to 12 hours. You’re looking for the leather to be dry to the touch, no longer sticky, and peel away cleanly from the parchment paper.
Using Your Oven:
If you don’t have a dehydrator, your oven can do the job. Preheat your oven to its lowest possible temperature, ideally between 140°F and 170°F (60°C to 77°C). If your oven doesn’t go that low, you can prop the oven door open slightly with a wooden spoon to allow moisture to escape and prevent overheating.
Line a baking sheet with parchment paper, ensuring it covers the entire surface. Pour your fruit puree onto the parchment paper and spread it into a very thin, even layer, about 1/8 inch thick. Try to get it as consistent as possible to ensure even drying.
Place the baking sheet in the preheated oven. The drying time in the oven can also vary significantly, but expect it to take anywhere from 4 to 8 hours, or even longer. Check on your fruit leather periodically. It’s ready when it’s no longer sticky to the touch, can be easily peeled from the parchment paper, and feels pliable rather than wet. Be patient with this process; rushing it can result in overly brittle or sticky leather.
Cooling and Storing Your Fruit Leather
Once your fruit leather has reached the desired consistency – pliable, slightly chewy, and not sticky – carefully remove it from the dehydrator or oven. Allow it to cool completely on the parchment paper or baking sheet. As it cools, it will firm up slightly more.
Once completely cool, you can cut the fruit leather into strips or shapes. If it’s still a little soft, you can place it back in the dehydrator or oven for a little longer until it reaches your preferred texture. If it’s too brittle, it may have dried for too long.
To store your homemade fruit leather, roll up the strips tightly. You can wrap each roll individually in plastic wrap or parchment paper to prevent them from sticking together. Store the wrapped fruit leather in an airtight container at room temperature for up to a week, or in the refrigerator for several weeks. For longer storage, you can freeze it. Enjoy your delicious, homemade fruit leather as a healthy snack, a lunchbox treat, or even a fun addition to a charcuterie board!
Conclusion:
Embarking on the journey of making your own fruit leather is incredibly rewarding and surprisingly simple! This homemade fruit leather recipe is a fantastic way to preserve fresh fruit, reduce food waste, and create a delicious, healthy treat that everyone will love. The vibrant flavors, chewy texture, and natural sweetness make it a perfect alternative to store-bought candies. It’s a project that’s not only fun for adults but also an engagin extractg activity to do with kids, teaching them about where food comes from and the joy of creation.
Whether you’re packing it for lunchboxes, enjoying it as an after-school snack, or even incorporating it into a picnic, fruit leather is incredibly versatile. I encourage you to gather your favorite fruits and give this recipe a try. You’ll be amazed at how easy it is to achieve such delightful results. Don’t be afraid to experiment with different fruit combinations to discover your signature blend!
Frequently Asked Questions:
Q: How long does homemade fruit leather last?
A: Properly stored in an airtight container at room temperature, your fruit leather should last for about 1 to 2 weeks. For longer storage, you can refrigerate it for up to a month, or even freeze it for several months. Make sure it’s completely cooled before sealing it away to prevent condensation.
Q: Can I make fruit leather without a dehydrator?
A: Absolutely! While a dehydrator makes things very convenient, you can easily make fruit leather in your oven. Simply spread the fruit puree thinly on a parchment-lined baking sheet and bake at the lowest possible temperature (usually around 140-170°F or 60-77°C) with the oven door slightly ajar to allow moisture to escape. This process will take several hours, so patience is key!
Q: What are some fun flavor variations to try?
A: The possibilities are endless! Consider adding a pinch of cinnamon or nutmeg for warmth, a squeeze of lime or lemon juice for brightness, or even a touch of gin extractger for a zesty kick. Combinations like strawberry-banana, raspberry-apple, or mango-pineapple are always crowd-pleasers. Don’t hesitate to mix and match your favorite fruits!
Homemade Fruit Leather
A simple and delicious recipe for making your own fruit leather at home, perfect for snacks.
Ingredients
-
2 cups fruit, chopped
-
3 tbsp white sugar
-
½ whole lemon, just the juice
-
1/4 cup water
-
1 tsp vanilla extract
-
Pinch of salt
Instructions
-
Step 1
Puree the chopped fruit in a blender or food processor until smooth. -
Step 2
Pour the fruit puree into a saucepan. Add white sugar, lemon juice, water, vanilla extract, and salt. -
Step 3
Cook over medium heat, stirring constantly, until the mixture thickens to a pudding-like consistency, about 10-15 minutes. -
Step 4
Preheat oven to 170°F (77°C). Line a baking sheet with parchment paper or a silicone baking mat. -
Step 5
Spread the fruit mixture evenly onto the prepared baking sheet, about 1/8 to 1/4 inch thick. -
Step 6
Bake for 2-4 hours, or until the fruit leather is no longer sticky to the touch. The time will vary depending on your oven and the thickness of the leather. -
Step 7
Let cool completely on the baking sheet, then peel off the parchment paper. Cut into strips or desired shapes.
Important Information
Nutrition Facts (Per Serving)
It is important to consider this information as approximate and not to use it as definitive health advice.
Allergy Information
Please check ingredients for potential allergens and consult a health professional if in doubt.