Easy Easter Bunny Punch Recipe – Refreshing & Fun
Easter Bunny Punch is the ultimate way to add a burst of spring cheer to your holiday celebrations. As soon as those pastel colors hit the table, you know the fun is about to begin extract! This vibrant and refreshing drink isn’t just a beverage; it’s a centerpiece, a conversation starter, and a guaranteed crowd-pleaser, especially for the little ones (and the young at heart!). We all love a good Easter tradition, and this delightful Easter Bunny Punch recipe has quickly become a favorite in so many households. What makes it so special? It’s the perfect blend of sweet and tart, with a playful presentation that truly captures the spirit of the season. Get ready to hop into deliciousness with this easy-to-make, utterly charming punch that will have everyone asking for the recipe!
Easter Bunny Punch
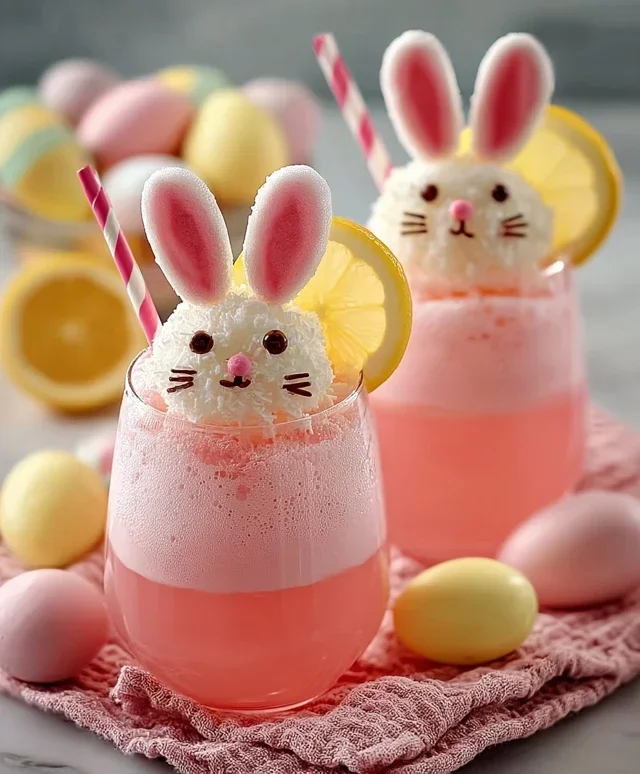
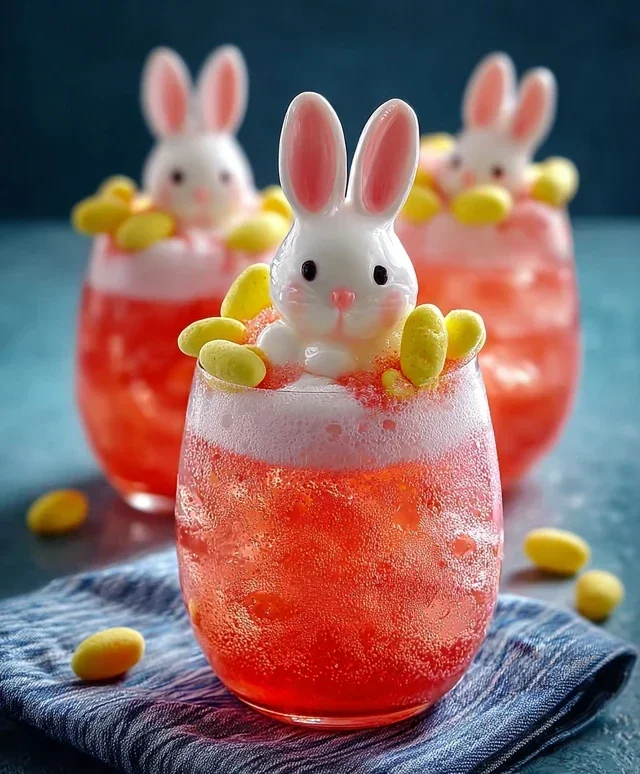
Get ready to hop into the spirit of spring with this utterly delightful Easter Bunny Punch! It’s a simple yet incredibly festive drink that’s sure to be a hit with both kids and adults at your Easter celebration. Imagin extracte a creamy, dreamy, perfectly pink concoction adorned with adorable bunny-themed decorations – it’s the ultimate way to add a splash of whimsical fun to your holiday table. This punch is so easy to make, it leaves you more time to focus on the egg hunts and family gatherings. Plus, it’s wonderfully customizable, allowing you to adjust the sweetness and tangin extractess to your preference. Let’s dive into creating this magical Easter treat!
Ingredients:
Instructions:
This Easter Bunny Punch is a breeze to assemble, making it perfect for last-minute party prep or a fun activity to do with the kids. The magic truly happens when you combine these simple ingredients and then get creative with the decorations. Here’s how we’ll bring this delightful drink to life:
Step 1: The Creamy Base
Begin extract by gathering your serving glasses. Tall, clear glasses work best to showcase the beautiful pink color and the festive decorations. For each serving, add 2 to 3 generous scoops of your strawberry ice cream directly into the glass. Don’t be shy with the ice cream; this is what gives our punch its wonderfully creamy texture and a delightful strawberry flavor base. The colder the ice cream, the slower it will melt, ensuring a perfect consistency for longer. You can even pre-scoop the ice cream and keep it in the freezer for a few minutes while you prepare the other ingredients to prevent it from softening too much.
Step 2: Adding the Tang and Fizz
Once your ice cream is nestled in its glass, it’s time to introduce the liquids. Carefully pour ½ cup of strawberry lemonade over the ice cream in each glass. The tartness of the lemonade will cut through the richness of the ice cream, creating a perfectly balanced flavor profile. Follow this by gently pouring in ½ cup of lemon-lime soda. The soda adds a lovely fizz and a touch more citrusy zest, making the punch light and refreshing. As you pour, you’ll notice the ice cream will start to swirl and blend with the liquids, creating a beautiful marbled effect. Be sure to pour slowly to avoid overflowing the glass, especially if you’ve used a generous amount of ice cream.
Step 3: The Marshmallow Clouds
Now for the fun part – the decorations! This is where your Easter Bunny Punch truly comes to life. Take your Bunny Peeps marshmallow candies and decide how you want to adorn your glasses. You can gently press a Peep onto the rim of each glass, letting its cute bunny shape peek out. Alternatively, you can carefully place one or two Peeps directly into the punch. They’ll float delightfully and add a burst of color and chewy sweetness to every sip. If you’re using larger Peeps, you might even want to cut them in half to make them more manageable as a garnish.
Step 4: Little Puffs of Sweetness
To further enhance the Easter theme and add another layer of texture, we’ll introduce the mini marshmallows. Sprinkle a handful of mini marshmallows into each glass of punch. They will float on top, resembling fluffy little clouds, and add a delightful chewy contrast to the creamy drink. Some of the mini marshmallows might sink to the bottom, which is perfectly fine – they’ll still be a sweet surprise with every spoonful. You can also use a few extra mini marshmallows to create a little pile on top of the Peeps for an extra whimsical touch.
Step 5: A Sprinkle of Magic
The final touch to make your Easter Bunny Punch truly spectacular is a generous dusting of colorful sprinkles. Grab your favorite Easter-themed sprinkles – think pastel colors, tiny eggs, or even little bunny shapes if you can find them! Sprinkle them liberally over the top of the punch, letting them land on the Peeps, marshmallows, and the foamy surface of the drink. This adds a vibrant visual appeal and a subtle crunch that complements the smooth texture of the punch. It’s the perfect way to make your creation look like it’s straight out of an Easter wonderland. Serve immediately and enjoy the smiles it brings!
Conclusion:
So there you have it – our delightful Easter Bunny Punch recipe! This vibrant and refreshing drink is an absolute showstopper for any spring celebration. Its beautiful pastel colors and fruity flavor profile make it a huge hit with both kids and adults alike. It’s incredibly easy to assemble, allowing you more time to enjoy the festivities. Whether you’re hosting a brunch, a backyard egg hunt, or a family gathering, this punch is sure to add a touch of festive cheer and a burst of deliciousness to your Easter table.
We love serving this Easter Bunny Punch in a large punch bowl adorned with fresh berries and a few edible flowers for an extra special touch. For individual servings, you can rim the glasses with colored sugar or add a colorful paper straw. Don’t be afraid to get creative with variations! You can swap out the pineapple juice for orange juice, or add a splash of raspberry sorbet for an even creamier, more decadent twist. The possibilities are endless! I truly hope you give this fantastic Easter Bunny Punch recipe a try this year. It’s guaranteed to bring smiles and a delightful taste of spring to your loved ones.
Frequently Asked Questions:
Can I make this punch ahead of time?
Yes, you absolutely can! You can prepare the base of the punch (all ingredients except the sparkling beverage and ice) a few hours in advance and store it in the refrigerator. Add the sparkling beverage and ice just before serving to keep it fizzy and perfectly chilled.
What if I don’t have a punch bowl?
No problem at all! You can easily make this Easter Bunny Punch in a large pitcher or even individual glasses. If using a pitcher, simply combine all ingredients and stir well. Serve over ice in your guests’ glasses.
Is this punch non-non-alcoholic alternativeic?
The recipe as written is non-non-non-alcoholic alternativeic, making it perfect for all ages. However, if you’re hosting an adult gathering, you could easily add a shot of vodka extract, white rum extract, or even a sparkling rosé to individual glasses or to the main punch bowl (for those who wish to add it).
Easter Bunny Punch
A festive and fun Easter punch perfect for spring celebrations, featuring strawberry ice cream and classic Easter candies.
Ingredients
-
2 to 3 scoops of strawberry ice cream
-
½ cup strawberry lemonade
-
½ cup lemon-lime soda
-
Bunny Peeps marshmallow candies
-
Mini marshmallows
-
Colorful sprinkles
Instructions
-
Step 1
In a punch bowl or large pitcher, add the strawberry ice cream. -
Step 2
Pour in the strawberry lemonade. -
Step 3
Add the lemon-lime soda for fizziness. -
Step 4
Gently stir to combine the ingredients, allowing the ice cream to melt slightly and create a creamy texture. -
Step 5
Add Bunny Peeps marshmallow candies and mini marshmallows to the punch bowl. -
Step 6
Sprinkle colorful sprinkles over the top for a festive finish. -
Step 7
Serve immediately in glasses, ensuring each serving gets some of the candies.
Important Information
Nutrition Facts (Per Serving)
It is important to consider this information as approximate and not to use it as definitive health advice.
Allergy Information
Please check ingredients for potential allergens and consult a health professional if in doubt.