Bunny Rabbit Cake-Festive Easter Treat Recipe
Bunny Rabbit Cake isn’t just a dessert; it’s an invitation to pure joy and whimsical delight! There’s something undeniably magical about a cake shaped like our furry, hopping friends, especially when it’s meant for birthdays, Easter celebrations, or just a sprinkle of everyday fun. Children’s eyes light up with wonder, and even the most grown-up among us can’t help but smile at its charming appearance. What makes this Bunny Rabbit Cake so beloved? It’s the perfect blend of delicious cake and adorable artistry, a creation that’s as enjoyable to make as it is to devour. We’re talking about a centerpiece that sparks conversation, creates lasting memories, and tastes absolutely heavenly. Get ready to hop into the kitchen and create your very own masterpiece!
Bunny Rabbit Cake
There’s something undeniably charming about a bunny rabbit cake. It’s a classic for Easter, birthdays, or just whenever you want to bring a little extra whimsy to your table. This recipe aims to guide you through creating a delightful bunny cake that’s as fun to make as it is to eat. We’ll focus on a simple yet effective design that can be adapted to your own creative flair. Get ready to bake a treat that’s sure to hop into everyone’s hearts!
Ingredients:
Preparing the Batter
The foundation of any great cake is a well-made batter. For our bunny cake, we’ll start by ensuring all our dry ingredients are combined and our wet ingredients are ready to go. This helps guarantee an even distribution of leavening agents and flavors, resulting in a tender and delicious cake.
Step 1: Dry Ingredient Combination
In a medium bowl, whisk together the all-purpose flour, baking soda, and salt. It’s important to sift these ingredients or whisk them thoroughly to break up any lumps and aerate the flour. This step helps prevent pockets of baking soda or salt in your finished cake, ensuring a consistent flavor and texture. Set this bowl aside.
Step 2: Creaming Butter and Sugar
In a large mixing bowl, cream together the softened unsalted butter and granulated sugar. You can use a stand mixer with a paddle attachment or a hand mixer for this. Beat them together on medium speed until the mixture is light and fluffy, usually for about 3-5 minutes. This process incorporates air into the butter and sugar, which contributes to the cake’s lightness and tender crum extractb. It’s crucial that your butter is truly softened – not melted. Softened butter will cream properly, while melted butter can lead to a greasy and dense cake.
Step 3: Incorporating Eggs and Vanilla
Next, add the large eggs one at a time, beating well after each addition. Make sure each egg is fully incorporated before adding the next. Scrape down the sides of the bowl as needed to ensure everything is mixed evenly. Once all the eggs are in, stir in the vanilla extract. The vanilla will add a beautiful aroma and classic flavor to our cake.
Step 4: Alternating Dry and Wet Ingredients
Now, we’ll gradually add the dry ingredients (flour mixture) and the buttermilk to the butter mixture, alternating between them. Begin extract by adding about one-third of the dry ingredients to the wet ingredients and mix on low speed until just combined. Then, add half of the buttermilk and mix until incorporated. Repeat this process, adding another third of the dry ingredients, then the remaining buttermilk, and finally, the last of the dry ingredients. It’s important not to overmix the batter once the flour is added, as this can develop the gluten too much and result in a tough cake. Mix just until no dry streaks of flour remain.
Baking the Bunny Shapes
This is where the fun begin extracts! We’ll bake the cake in a way that allows us to easily assemble our bunny.
Step 5: Shaping and Baking the Cake
For a classic bunny shape, you can use a standard 9×13 inch baking pan for the body and a small bowl (about 1.5 to 2 quart capacity) for the head. Grease and flour both your baking pan and your bowl thoroughly. Pour about two-thirds of the batter into the 9×13 inch pan and the remaining one-third into the prepared bowl. Smooth the tops with a spatula. Bake the 9×13 inch pan at 350°F (175°C) for 30-35 minutes, or until a toothpick inserted into the center comes out clean. Bake the bowl-shaped cake for 25-30 minutes, or until a toothpick inserted comes out clean. Let the cakes cool in their pans for about 10-15 minutes before inverting them onto a wire rack to cool completely. Ensure the cakes are completely cool before frosting. Trying to frost a warm cake is a recipe for disaster!
Frosting and Decorating Your Bunny
Once our cake pieces are cooled, it’s time to transform them into an adorable bunny.
Step 6: Making the Frosting and Assembly
While the cakes are cooling, prepare your frosting. In a medium bowl, whisk together the powdered sugar and milk until smooth and creamy. If the frosting is too thick, add a little more milk, a teaspoon at a time, until you reach your desired consistency. Stir in the vanilla extract. You can tint portions of the frosting with food coloring if you like, for example, a light pink for the ears and nose.
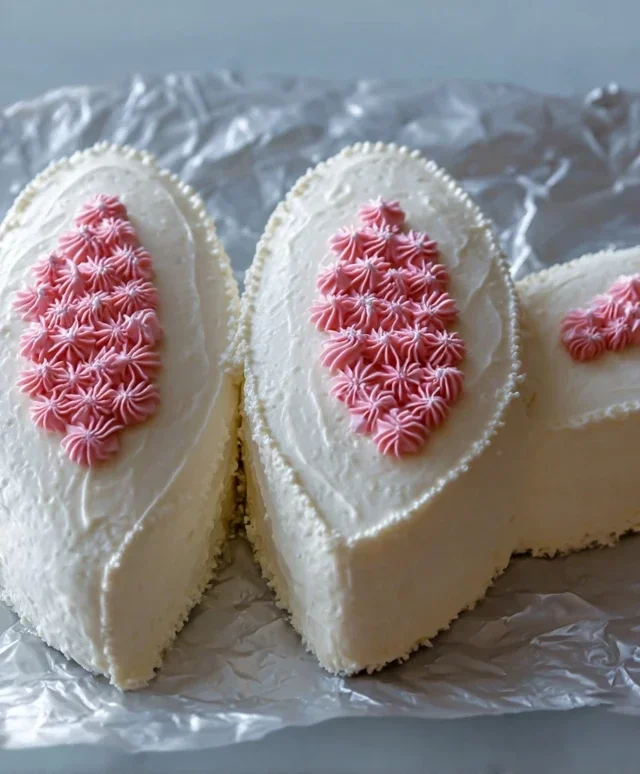
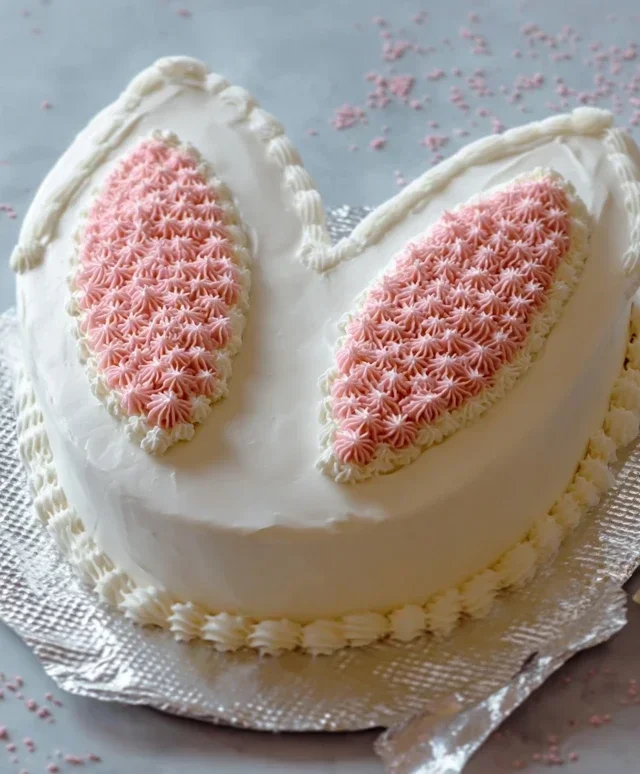
Once the cakes are completely cool, arrange the 9×13 inch cake (which will be the body) on your serving platter. Place the bowl-shaped cake on top of the 9×13 inch cake, towards one end, to create the head. You can trim the bottom of the bowl cake slightly if it’s uneven to help it sit more securely. Use a generous amount of frosting to “glue” the head to the body. Then, frost the entire cake, smoothing the frosting to create a soft, fluffy bunny appearance. Use leftover frosting or a bit of colored frosting to create the ears, nose, and eyes. You can use candies like jelly beans for the eyes and nose, or pipe them on. Sprinkles can add a festive touch to the ears or body. Get creative with your decorations – perhaps some edible flowers or a little frosting bowtie!
Enjoy your delightful homemade bunny rabbit cake!
Conclusion:
And there you have it – a truly delightful Bunny Rabbit Cake that’s sure to hop into the hearts of everyone who tastes it! This recipe is fantastic because it’s not just incredibly adorable, making it perfect for Easter or any spring celebration, but it’s also surprisingly achievable for home bakers. The moist cake base, paired with creamy frosting and simple decorating techniques, means you can create a showstopper without needing professional skills. It’s a recipe that brings joy to both the making and the eating!
When it comes to serving, this Bunny Rabbit Cake is a star on its own. However, you could elevate it further by serving slices alongside fresh berries, a dollop of whipped cream, or even a side of carrot sticks for a playful nod to the bunny theme. For variations, feel free to experiment with different cake flavors – a lemon cake would offer a lovely zesty contrast, or a subtle chocolate cake could appeal to chocolate lovers. You can also get creative with the frosting colors to match your theme or personal preference. I highly encourage you to give this recipe a try; the smiles it generates are absolutely worth it!
Frequently Asked Questions about the Bunny Rabbit Cake:
Q: Can I make this cake ahead of time?
A: Absolutely! You can bake and cool the cake layers a day in advance. Once completely cooled, wrap them tightly in plastic wrap and store them at room temperature or in the refrigerator. Frosting the cake the day you plan to serve it is generally best for the freshest taste and appearance, but you can also frost it a day ahead and store it, covered, in the refrigerator. Just allow it to come to room temperature for about 30 minutes before serving for the best texture.
Q: What if I’m not very good at decorating?
A: Don’t worry at all! This Bunny Rabbit Cake is designed to be forgiving. Simple techniques like using a spatula to smooth the frosting for the bunny’s fur, and using candy or small cookies for the eyes and nose, are very easy to master. Even a slightly rustic finish adds to the charm. You can also find readily available piping tips that create simple fur textures if you want to try a bit more advanced, but it’s not necessary for a beautiful result.
Bunny Rabbit Cake
A delightful and whimsical cake shaped like a bunny rabbit, perfect for Easter celebrations or any fun occasion.
Ingredients
-
2 cups all-purpose flour
-
1.5 cups granulated sugar
-
1 teaspoon baking soda
-
0.5 teaspoon salt
-
1 cup buttermilk
-
0.5 cup vegetable oil
-
2 large eggs
-
1 teaspoon vanilla extract
-
1 cup powdered sugar
-
2 tablespoons milk
Instructions
-
Step 1
Preheat oven to 350°F (175°C). Grease and flour two 8-inch round cake pans. -
Step 2
In a large bowl, whisk together flour, sugar, baking soda, and salt. -
Step 3
In a separate bowl, combine buttermilk, vegetable oil, eggs, and vanilla extract. -
Step 4
Add the wet ingredients to the dry ingredients and mix until just combined. Do not overmix. -
Step 5
Pour batter evenly into prepared pans and bake for 30-35 minutes, or until a toothpick inserted into the center comes out clean. -
Step 6
Let cakes cool in pans for 10 minutes, then invert onto a wire rack to cool completely. -
Step 7
Once cool, arrange the cakes to form a bunny shape (one for the body, one for the head, and cut ears from scraps or use extra batter). Frost with a simple glaze made from powdered sugar and milk.
Important Information
Nutrition Facts (Per Serving)
It is important to consider this information as approximate and not to use it as definitive health advice.
Allergy Information
Please check ingredients for potential allergens and consult a health professional if in doubt.