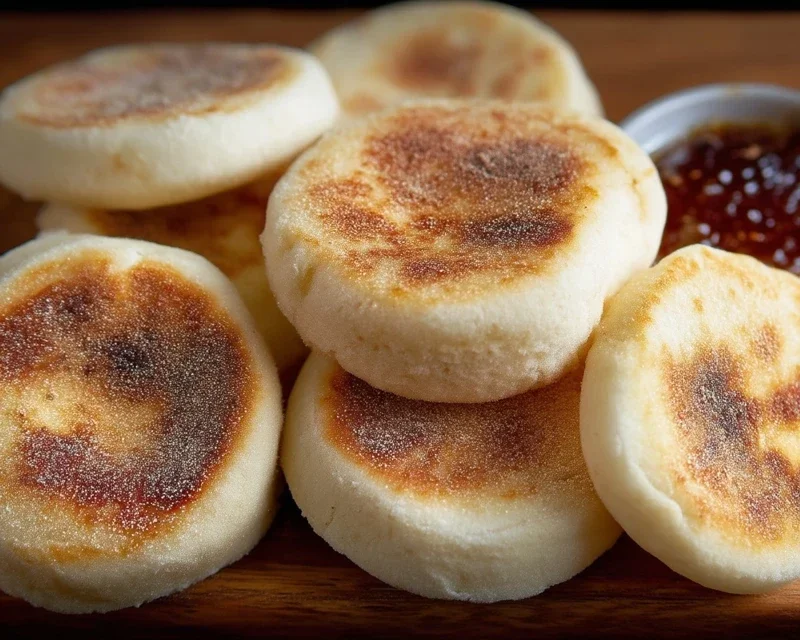
Easy Homemade English Muffins – Perfect Breakfast Treat
Easy Homemade English Muffins are a revelation, transforming your breakfast from ordinary to extraordinary with just a few simple ingredients and a little bit of patience. Forget those bland, pre-packaged imposters; there’s something incredibly satisfying about pulling warm, golden rounds from your own oven, each one perfectly toasted and ready to cradle your favorite toppings. People adore English muffins for their unique texture – that delightful chew, the nooks and crannies just beggin extractg to be filled with butter, jam, or a perfectly fried egg. They’re the quintessential breakfast bread, a versatile canvas that brings comfort and joy to any morning. What truly makes these easy homemade English muffins special is the incredible sense of accomplishment and the superior flavor you achieve right in your own kitchen. You’ll wonder why you ever bought them before!

Easy Homemade English Muffins
There’s something incredibly satisfying about a warm, homemade English muffin, especially when it’s studded with those signature nooks and crannies, perfect for catching melted butter and jam. While store-bought versions are convenient, nothing truly compares to the aroma and texture of baking them yourself. The good news? Making them at home is surprisingly straightforward and yields a far superior product. Forget complicated techniques; this recipe is designed for ease and delicious results, perfect for begin extractners and busy bakers alike. Imagin extracte the delight of pulling a batch of golden-brown beauties from your oven, ready to be toasted and enjoyed for breakfast or a weekend brunch.
This recipe focuses on simplicity without sacrificing that authentic English muffin experience. We’ll be using readily available ingredients, and the process involves minimal kneading, making it an approachable project for any day of the week. So, gather your ingredients, put on your apron, and let’s get baking!
Ingredients:
Getting Started: The Dough Foundation
The first step is to activate our yeast and get the dough going. In a large mixing bowl, combine the warm water and sugar. Give it a quick stir to help dissolve the sugar. Now, sprinkle the instant dry yeast over the top. Let this mixture sit undisturbed for about 5-10 minutes. You’ll know the yeast is happy and active when it becomes foamy and bubbly on the surface, looking almost like a creamy layer. This “blooming” process is crucial as it proves the yeast is alive and ready to work its magic, giving our muffins their lift. If you don’t see any foam, your yeast might be old, and it’s best to start over with fresh yeast to ensure a good rise.
Once the yeast is bloomed, add the oil (or melted butter) to the bowl. Give it another gentle stir to incorporate. Now, it’s time for the flour. Add 2 ¾ cups of your chosen flour and the salt. Start mixing everything together with a sturdy spoon or a spatula until a shaggy, somewhat sticky dough begin extracts to form. Don’t worry if it looks a bit messy at this stage; we’re not aiming for a perfectly smooth dough right away.
Developing the Dough and Shaping
If the dough seems excessively sticky and is clingin extractg too much to the sides of the bowl, gradually add the extra ¼ cup of flour, a tablespoon at a time, until the dough just starts to pull away from the sides. It should still be slightly tacky to the touch, but manageable. Now, we’ll switch to kneading. Turn the dough out onto a lightly floured surface. Knead the dough for about 5-7 minutes. This is where you’ll develop the gluten, which gives our muffins their structure and chewy texture. Push the dough away from you with the heels of your hands, then fold it back over itself. Rotate and repeat. You’re looking for a dough that is smooth and elastic. It will still be somewhat soft, but it shouldn’t be sticky enough to leave a significant residue on your hands.
After kneading, lightly oil the mixing bowl you used earlier. Place the kneaded dough into the oiled bowl, turning it to coat both sides with a thin layer of oil. This prevents it from drying out. Cover the bowl tightly with plastic wrap or a clean kitchen towel. Find a warm, draft-free spot in your kitchen for the dough to rise. This could be in a slightly warm oven (turned off, of course, just for ambient warmth), or simply on the counter if your kitchen is warm. Let the dough rise for about 1 to 1 ½ hours, or until it has doubled in size. This resting period is essential for flavor development and for creating that airy interior.
Forming the Muffins and the Crucial Cornmeal Dusting
Once the dough has doubled, gently punch it down to release the air. Turn the dough out onto a lightly floured surface again. We’re going to shape our English muffins. You have a couple of options here. You can divide the dough into 8 equal portions and gently flatten each portion into a disc about ½ inch thick. Alternatively, you can roll the dough out to about ½ inch thickness and use a round cookie cutter (about 3 inches in diameter) to cut out your muffin shapes. If you use the cookie cutter method, gently re-roll any dough scraps and cut out more muffins until you’ve used all the dough.
Now comes the critical step for that signature texture: the cornmeal. Lightly dust a baking sheet (or two, depending on size) with cornmeal. Carefully place each shaped muffin dough disc onto the cornmeal-dusted baking sheet, making sure to leave some space between them. Generously sprinkle more cornmeal over the tops and sides of each muffin. This cornmeal acts as a barrier, preventing the muffins from sticking during the initial cooking and giving them that characteristic toasted exterior. We’ll let these shaped muffins rest, covered loosely with plastic wrap, for another 20-30 minutes. This second rise will make them even puffier and lighter.
The Pan-Frying Technique: Achieving the Nooks and Crannies
This is where the magic really happens to create those sought-after nooks and crannies. Heat a large, heavy-bottomed skillet or griddle over medium-low heat. You want a consistent, gentle heat, not high heat, which would burn the outside before the inside cooks. Add a small amount of oil or butter to the skillet, just enough to lightly coat the surface.
Carefully place 2-3 English muffins into the heated skillet at a time, ensuring you don’t overcrowd the pan. Cook them for about 5-7 minutes per side. You’re looking for a beautiful golden-brown color. Resist the urge to press down on them with a spatula, as this can flatten them and prevent them from developing those airy pockets. The dough will puff up significantly as it cooks. If you notice any spots browning too quickly, reduce the heat slightly. The goal is to cook them through to the center while achieving a lovely crust.
Finishing in the Oven for Perfection
Once the English muffins have achieved a nice golden-brown color on both sides in the skillet, it’s time to finish them in the oven. Preheat your oven to 375°F (190°C). Transfer the partially cooked muffins from the skillet to a baking sheet. Place the baking sheet in the preheated oven and bake for another 5-10 minutes, or until the muffins are cooked through and feel firm to the touch. You can test for doneness by inserting a skewer or toothpick into the center; it should come out clean.
Let the finished English muffins cool on a wire rack for at least 10-15 minutes before slicing them open. This cooling period is important for the texture to set. To enjoy them at their best, split them open horizontally with a fork or a knife (using a fork helps preserve those nooks and crannies better than a knife). Toast them until golden brown and serve with your favorite toppings. They are truly divine!
Conclusion:
And there you have it! My foolproof guide to making easy homemade English muffins right in your own kitchen. You’ve seen just how simple it is to transform a few basic ingredients into those wonderfully chewy, perfectly nooks-and-cranny-filled breakfast stars. This recipe is fantastic because it eliminates the need for store-bought versions, which often lack that authentic texture and flavor, and it’s surprisingly quick and rewarding. Imagin extracte the satisfaction of pulling these golden beauties from your pan, ready to be toasted and slathered with butter, jam, or your favorite spread. They’re perfect not just for breakfast but also for a quick lunch or even a light dinner. Don’t hesitate to experiment with this base recipe – adding herbs, cheese, or even a touch of sweetness can lead to delicious variations. I truly encourage you to give this easy homemade English muffin recipe a try; you might just find it becomes a new family favorite!
Frequently Asked Questions:
Why aren’t my English muffins rising very well?
This can often be due to yeast that is no longer active. Make sure your yeast is fresh and that your water is warm (not hot!) when proofing it. Also, allow the dough sufficient time to rise in a warm, draft-free place.
Can I freeze English muffins?
Absolutely! Once cooled completely, you can freeze your homemade English muffins in an airtight container or freezer bag for up to 2-3 months. To reheat, simply toast them directly from frozen.
Easy Homemade English Muffins
Create delicious, classic English muffins at home with this straightforward recipe.
Ingredients
-
1 ¼ cups warm water
-
1 tablespoon sugar
-
1 teaspoon instant dry yeast
-
2 tablespoon canola oil
-
2 ¾ cups all purpose flour
-
1 teaspoon salt
-
cornmeal for dusting
Instructions
-
Step 1
In a large bowl, combine warm water, sugar, and instant dry yeast. Let sit for 5 minutes until foamy. -
Step 2
Stir in the oil. -
Step 3
Add the flour and salt. Mix until a shaggy dough forms. Turn out onto a lightly floured surface and knead for 5-7 minutes until smooth and elastic. Add up to 1/4 cup extra flour if needed. -
Step 4
Shape the dough into a log, then cut into 8 equal pieces. Flatten each piece into a disc about ½ inch thick. Place on a baking sheet lined with parchment paper and lightly dusted with cornmeal. Cover loosely and let rise for 10 minutes. -
Step 5
Heat a lightly oiled griddle or frying pan over medium-low heat. Sprinkle generously with cornmeal. Cook the muffins for 5-7 minutes per side, until golden brown and cooked through. -
Step 6
Remove from the griddle and let cool slightly on a wire rack before splitting and toasting.
Important Information
Nutrition Facts (Per Serving)
It is important to consider this information as approximate and not to use it as definitive health advice.
Allergy Information
Please check ingredients for potential allergens and consult a health professional if in doubt.