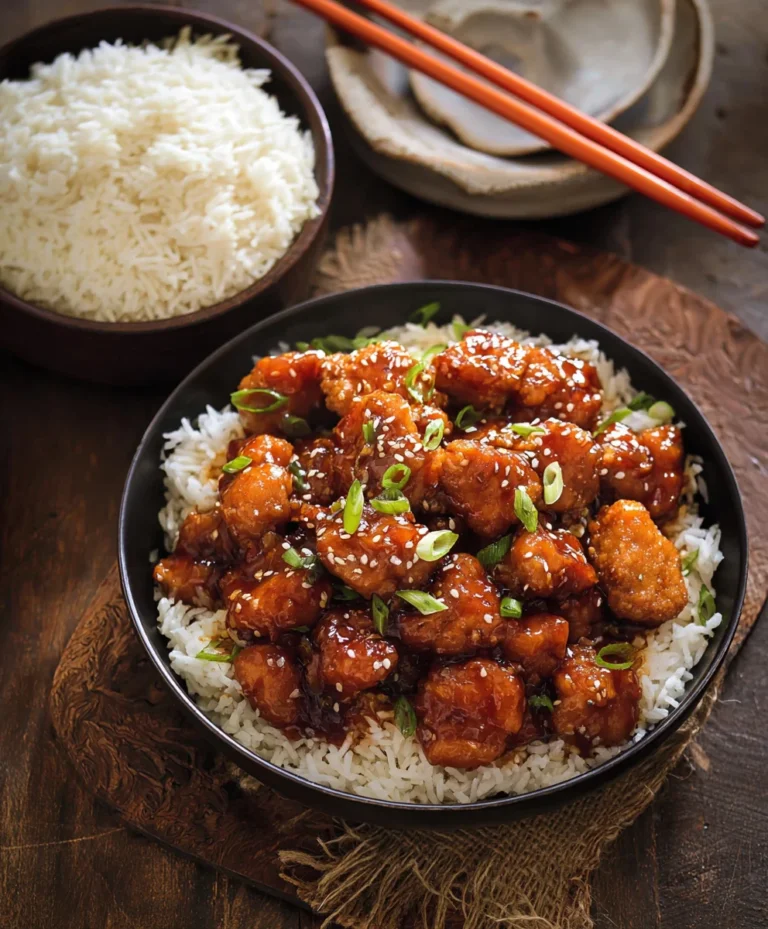
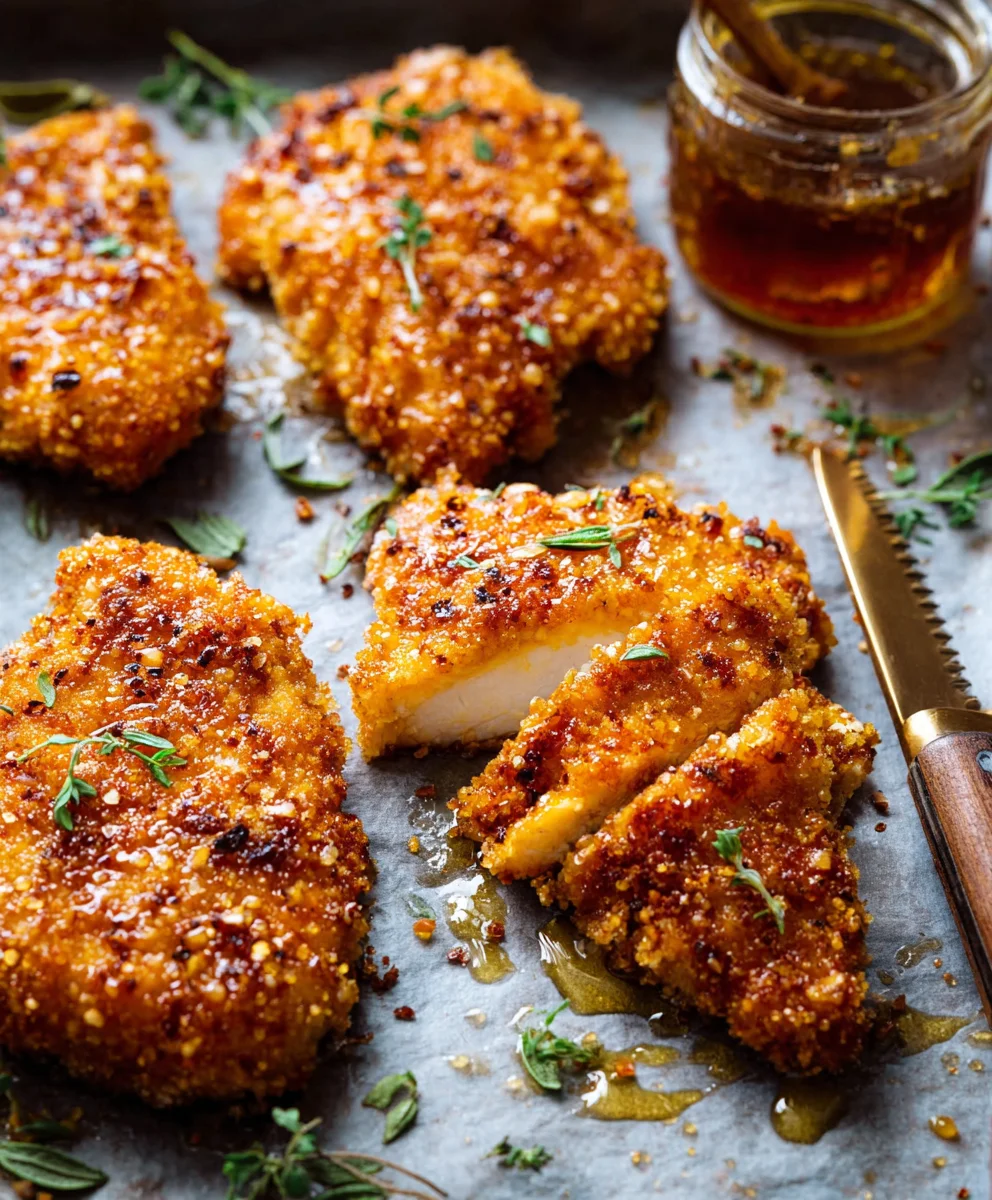
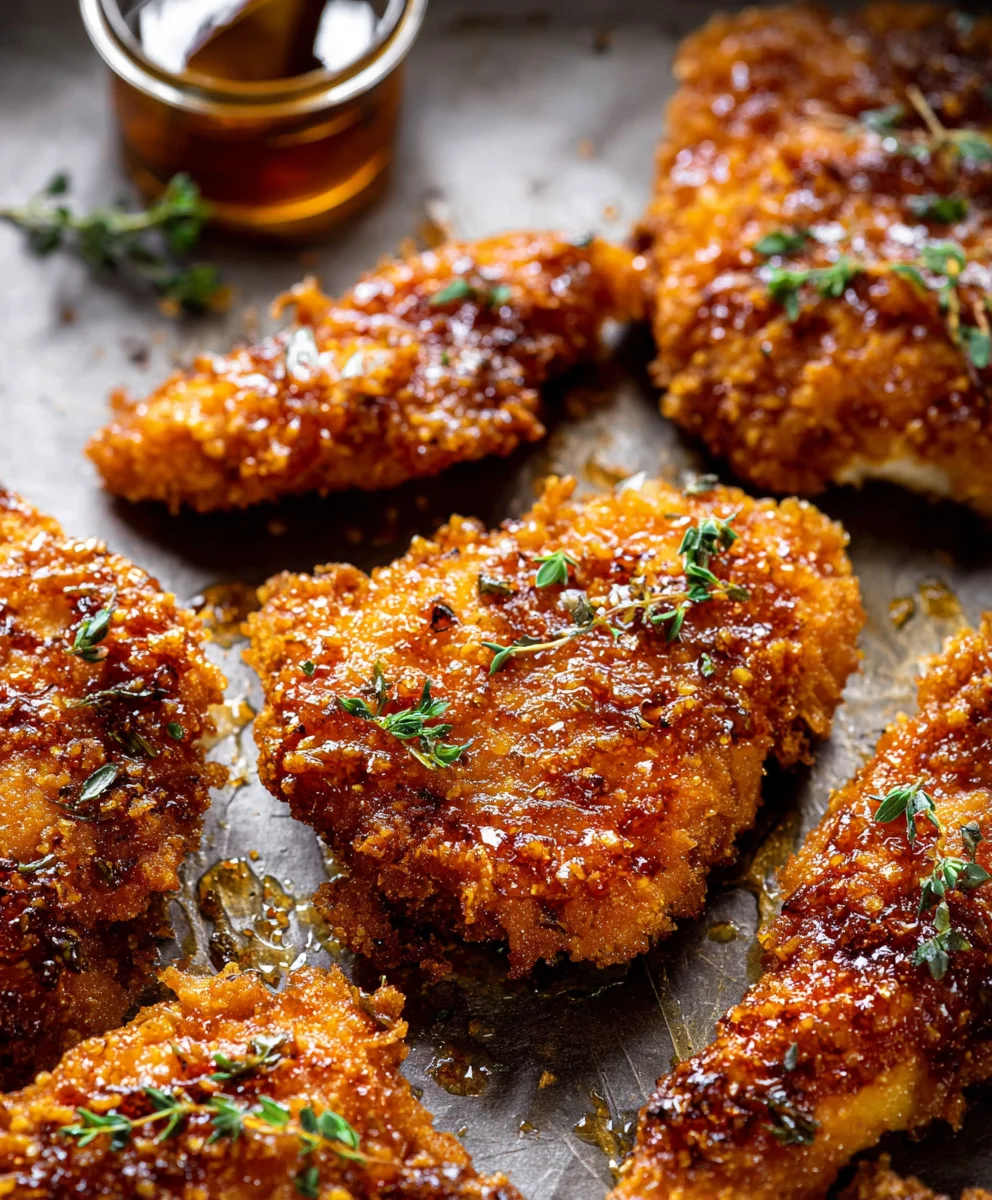
Baked Crunchy Hot Honey Chicken-Easy Recipe
Baked Crunchy Hot Honey Chicken is more than just a weeknight dinner; it’s a flavor explosion that will have everyone beggin extractg for secogin extract. Imagine succulent, tender chicken pieces coated in a shatteringly crisp crust, then drizzled with a sweet and spicy hot honey glaze that caramelizes to perfection. It’s that irresistible combination of textures and tastes – the satisfying crunch giving way to juicy chicken, followed by the warm, gentle kick of chili and the soothing sweetness of honey – that makes this dish so utterly addictive. We love it because it delivers all the indulgence of fried chicken without the fuss or the mess, offering a surprisingly healthy yet incredibly satisfying alternative. What truly sets our Baked Crunchy Hot Honey Chicken apart is the magic that happens in the oven, transforming simple ingredients into something truly spectacular.
Ingredients:
- 6 cups cornflakes (use gluten-free if needed)
- 1/4 cup grated parmesan cheese
- 1 teaspoon smoked paprika
- 1/2 teaspoon onion powder
- 1/2 teaspoon garlic powder
- 2 large eggs, beaten
- 2 tablespoons hot sauce
- 2 pounds chicken breast tenderloins
- Extra virgin extract olive oil, for drizzling
- 1/2 cup honey
- 2-3 tablespoons hot sauce
- 1-3 teaspoons cayenne pepper
- 3/4 teaspoon chipotle chili powder
- 1/2 teaspoon garlic powder
- 1/2 teaspoon onion powder
Preparing the Chicken and Cornflake Coating
Step 1: Preheat Your Oven and Prepare the Baking Sheets
Before we get our hands dirty with chicken, let’s get the oven ready. Preheat your oven to a nice hot 400°F (200°C). This temperature is crucial for achieving that perfect crispy exterior on our Baked Crunchy Hot Honey Chicken. While the oven heats up, take two large baking sheets and line them with parchment paper. This is a lifesaver for cleanup later! Alternatively, you can lightly grease the baking sheets with a little bit of non-stick spray or olive oil, but parchment paper usually guarantees no sticking. Ensure you have enough space on these sheets to lay out the chicken in a single layer, as overcrowding can lead to steaming rather than baking, which is the enemy of crispiness.
Step 2: Create the Crispy Cornflake Coating
Now for the magic ingredient that gives our chicken its satisfying crunch: cornflakes! Pour all 6 cups of cornflakes into a large resealable plastic bag or a food processor. If you’re using a plastic bag, seal it tightly and then get a rolling pin or the bottom of a heavy pot and start crushing the cornflakes. You want to break them down into small, coarse crum extractbs – not a fine powder, but not whole flakes either. Aim for pieces that are about the size of coarse sand. If you’re using a food processor, pulse them a few times until you reach the desired consistency. Once crushed, pour the corrum extractake crumbs into a shallow dish or a pie plate. To this, we’ll add our flavor boosters: 1/4 cup grated parmesan cheese, 1 teaspoon smoked paprika, 1/2 teaspoon onion powder, and 1/2 teaspoon garlic powder. Give this mixture a good whisk with a fork to ensure all the spices and cheese are evenly distributed throughoutrum extracte cornflake crumbs. This blend will form the delicious, savory crust for our chicken.
Step 3: Set Up the Breading Station
To effectively coat the chicken, we need a proper breading station. In a separate shallow dish or pie plate, crack your 2 large eggs. Add 2 tablespoons of hot sauce to the eggs. The hot sauce adds a subtle tang and a hint of heat, and also helps to loosen the eggs slightly, making them a better binder. Whisk the eggs and hot sauce together until well combined. Now you have two shallow dishes ready: one with the cornflake mixture and one with the egg mixture. We’ll also need a third clean plate or baking sheet to place the breaded chicken before it goes into the oven.
Step 4: Coat the Chicken Tenderloins
Take your 2 pounds of chicken breast tenderloins. Pat them thoroughly dry with paper towels. This is an important step, as excess moisture can prevent the coating from adhering properly. Now, working with a few tenderloins at a time, dip each piece first into the egg mixture, ensuring it’s fully coated on all sides. Let any excess egg drip off for a moment. Then, carefully transfer the egg-coated chicken to the cornflake mixture. Press the crum extractken gently into the crumbs, making sure to get a good, even coating. Don’t be afraid to really get rum extractthere and press to help the crumbs stick. Once coated, place the breaded tenderloin onto your clean plate or the prepared baking sheet. Repeat this process with all the chicken tenderloins, ensuring each piece is generously coated with the crispy cornflake mixture. Once all the chicken is breaded, arrange the tenderloins in a single layer on your parchment-lined baking sheets, leaving a little space between each piece for even cooking.
Step 5: Bake the Chicken to Golden Perfection
Drizzle the breaded chicken tenderloins generously with egin extracta virgin olive oil. You can do this from a height of about 6-8 inches to ensure an even coating. This olive oil helps the cornflakes crisp up beautifully and prevents them from drying out. Place the baking sheets into your preheated 400°F (200°C) oven. Bake for approximately 20-25 minutes. The cooking time can vary depending on the thickness of your tenderloins. You’re looking for the chicken to be cooked through – no pink inside – and for the cornflake coating to be a deep golden brown and impressively crunchy. You can check for doneness by cutting into the thickest part of a tenderloin; the juices should run clear.
Making the Hot Honey Glaze
Step 6: Prepare the Spicy Hot Honey Glaze
While the chicken is baking and getting nice and crispy, we’ll whip up the star of the show – the hot honey glaze. In a small saucepan, combine 1/2 cup of honey, 2-3 tablespoons of hot sauce (adjust this to your spice preference), 1-3 teaspoons of cayenne pepper (again, tailor this to how much heat you can handle!), 3/4 teaspoon of chipotle chili powder for a smoky depth, 1/2 teaspoon of garlic powder, and 1/2 teaspoon of onion powder. Stir everything together to combine.
Step 7: Simmer and Thicken the Glaze
Place the saucepan over medium-low heat. We don’t want to boil this vigorously, but rather gently simmer it. Stir the mixture constantly as it heats up. You’ll notice the honey will become more liquid, and all the spices will meld together beautifully. Let it simmer for about 3-5 minutes, stirring occasionally. The goal is for the glaze to slightly thicken and for the flavors to intensify. Be careful not to let it scorch. Once it has thickened to a syrupy consistency that coats the back of a spoon, remove it from the heat. This glaze will be incredibly fragrant and have a beautiful deep red hue.
Step 8: Glaze the Baked Chicken
Once the chicken tenderloins have finished baking and are perfectly golden and crunchy, carefully remove the baking sheets from the oven. Generously brush or drizzle the warm hot honey glaze all over the hot chicken. Ensure each piece is well-coated to get that sticky, sweet, and spicy kick with every bite. The heat from the chicken will help the glaze adhere beautifully. You can return the glazed chicken to the oven for an additional 1-2 minutes if you want the glaze to set a little more, or simply serve them immediately, as the residual heat will continue to meld the flavors. Serve these Baked Crunchy Hot Honey Chicken tenderloins hot and enjoy the explosion of flavors!
Conclusion:
There you have it – a comprehensive guide to creating the most irresistible Baked Crunchy Hot Honey Chicken! We’ve explored the simple yet effective steps to achieve that perfect crispy coating and the delightful sweet and spicy glaze that makes this dish a true winner. This recipe is all about bringin extractg a gourmet touch to your home cooking with minimal fuss.
I love serving this Baked Crunchy Hot Honey Chicken alongside creamy mashed potatoes, a fresh, crisp coleslaw, or even a simple side of steamed green beans. The versatility of this dish means it can be dressed up or down for any occasion.
Don’t be afraid to experiment with the spice level by adjusting the amount of chili flakes in the hot honey glaze, or even adding a pinch of cayenne pepper for an extra kick. You can also swap out the type of honey for something a little more floral or robust. The possibilities are endless!
I truly hope you enjoy making and devouring this Baked Crunchy Hot Honey Chicken as much as I do. It’s a fantastic way to impress your friends and family, or simply treat yourself to a delicious and satisfying meal.
Frequently Asked Questions:
Can I make the hot honey glaze ahead of time?
Absolutely! The hot honey glaze can be prepared a day or two in advance and stored in an airtight container in the refrigerator. Gently warm it up before drizzling over the chicken for the best results.
What if I don’t have cayenne pepper? Can I still make it spicy?
Yes, you can! While cayenne pepper adds an extra layer of heat, you can achieve spiciness by using more chili flakes in the hot honey glaze or by adding a dash of your favorite hot sauce to the glaze. Adjust the amount to your personal preference.
Baked Crunchy Hot Honey Chicken-Easy Recipe
Crispy baked chicken tenderloins coated in crunchy cornflakes and coated in a sweet and spicy hot honey glaze.
Ingredients
-
6 cups cornflakes (use gluten-free if needed)
-
1/4 cup grated parmesan cheese
-
1 teaspoon smoked paprika
-
1/2 teaspoon onion powder
-
1/2 teaspoon garlic powder
-
2 large eggs, beaten
-
2 tablespoons hot sauce
-
2 pounds chicken breast tenderloins
-
Extra virgin olive oil, for drizzling
-
1/2 cup honey
-
2-3 tablespoons hot sauce
-
1-3 teaspoons cayenne pepper
-
3/4 teaspoon chipotle chili powder
-
1/2 teaspoon garlic powder
-
1/2 teaspoon onion powder
Instructions
-
Step 1
Preheat your oven to 400°F (200°C) and line two large baking sheets with parchment paper. -
Step 2
Crush cornflakes into coarse crumbs. Combine with parmesan cheese, smoked paprika, 1/2 teaspoon onion powder, and 1/2 teaspoon garlic powder in a shallow dish. -
Step 3
In another shallow dish, whisk together 2 large eggs and 2 tablespoons of hot sauce. -
Step 4
Pat chicken tenderloins dry. Dip each piece in the egg mixture, then coat thoroughly in the cornflake mixture. Place breaded chicken in a single layer on the prepared baking sheets. -
Step 5
Drizzle chicken with olive oil and bake for 20-25 minutes, or until golden brown and cooked through. -
Step 6
While chicken bakes, combine honey, 2-3 tablespoons hot sauce, cayenne pepper, chipotle chili powder, 1/2 teaspoon garlic powder, and 1/2 teaspoon onion powder in a small saucepan. -
Step 7
Simmer the glaze over medium-low heat for 3-5 minutes, stirring, until slightly thickened. -
Step 8
Brush or drizzle the hot honey glaze generously over the baked chicken tenderloins. Serve immediately.
Important Information
Nutrition Facts (Per Serving)
It is important to consider this information as approximate and not to use it as definitive health advice.
Allergy Information
Please check ingredients for potential allergens and consult a health professional if in doubt.