Easy Pizza Sliders-Fun & Flavorful Beef Bites
Pizza sliders are more than just a fun appetizer; they’re a miniature explosion of pure joy, designed to bring smiles to any gathering. What is it about these bite-sized delights that captivates us so? It’s the perfect marriage of convenience and flavor, offering all the beloved characteristics of a classic pizza – the chewy crust, the savory sauce, the gooey cheese, and your favorite toppings – in an easily manageable and incredibly shareable format. Perfect for game nights, parties, or even a quick weeknight treat, these pizza sliders transform a simple meal into an event. They are wonderfully versatile, allowing everyone to customize their own little pizza masterpiece. Get ready to discover just how easy and utterly delicious making your own incredible pizza sliders can be!
Ingredients:
- 1 package dinner rolls (we used potato rolls for their softness and subtle sweetness)
- 2 cups shredded mozzarella cheese (low-moisture, part-skim works best for a good melt without becoming watery)
- Small package beef beef pepperoni slices (choose your favorite brand, but thinner slices tend to curl up nicely)
- 1/4 cup tomato sauce (a simple, good-quality pizza sauce or marinara works well)
- 1/2 teaspoon hot sauce (optional, for a little kick; adjust to your spice preference)
- 1/4 cup unsalted butter, melted (for that golden, crispy top)
- 2 teaspoons dried oregano (or a blend of Italian seasoning for more complex flavor)
Preparing the Base
Cutting the Rolls
The first step to creating these irresistible Pizza Sliders is preparing the dinner rolls. Take your package of dinner rolls and, using a sharp serrated knife, carefully slice the entire package horizontally. It’s crucial to try and keep the top and bottom halves as even as possible. If the rolls are small and tightly packed, you might find it easier to gently separate a few rows first before slicing. Imagin extracte you’re slicing a large loaf of bread, but with individual rolls. Once sliced, lay the bottom halves of the rolls onto a baking sheet lined with parchment paper. The parchment paper is your friend here, making cleanup a breeze and preventing any potential sticking. Ensure they are arranged in a single layer, ready to be loaded up with deliciousness.
Assembling the Pizza Sliders
Layering the Flavors
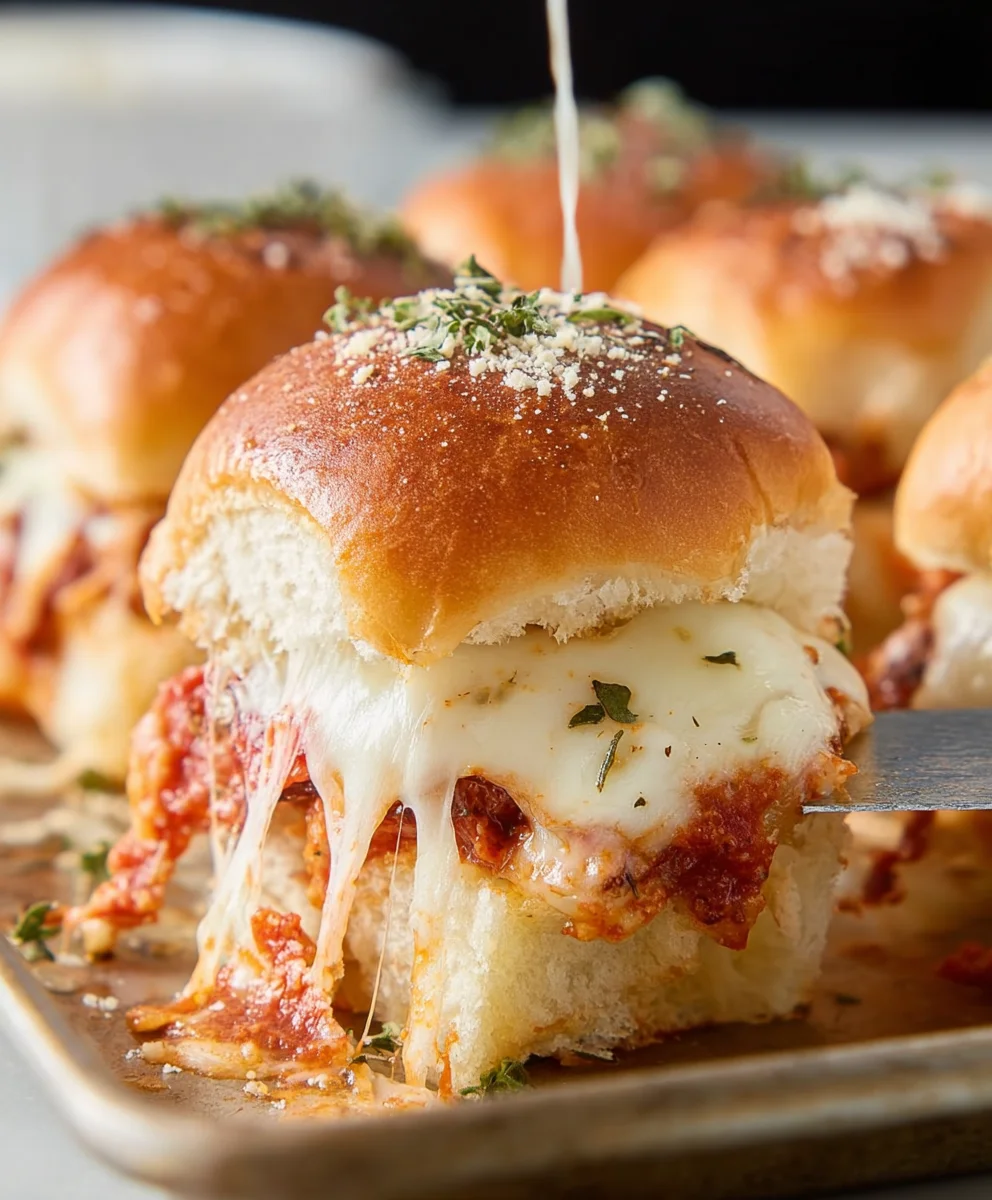
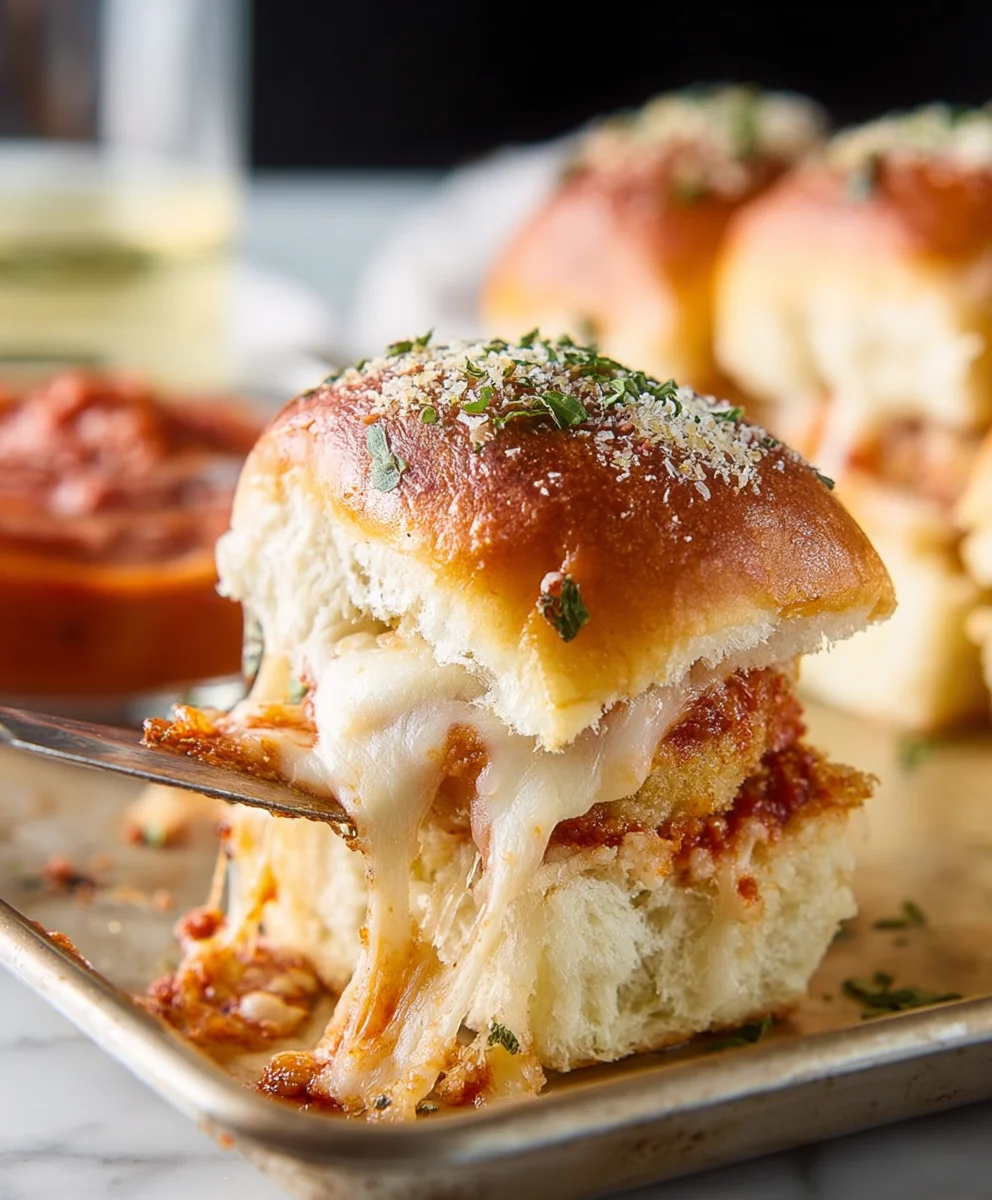
Now comes the fun part: building your Pizza Sliders! Evenly spread the 1/4 cup of tomato sauce over the bottom halves of the dinner rolls. You don’t want to go too heavy on the sauce, as it can make the buns soggy. A thin, even coating is perfect. If you’re adding a touch of heat, this is where you’d drizzle or dot the 1/2 teaspoon of hot sauce over the tomato sauce. Then, generously sprinkle about 1.5 cups of the shredded mozzarella cheese over the sauce. We’re saving a little cheese for the top! Don’t be shy with the cheese; it’s what holdsbeef pepperonieroni in place and creates that irresistible gooey factor. Next, artfully arrangebeef pepperoni pepperoni slices on top of the mozzarella. Try to overlap them slightly so each slider gets a beef pepperonint of pepperoni flavor. Finally, sprinkle the remaining 1/2 cup of mozzarebeef pepperonie over the pepperoni. This top layer of cheese acts as another binder and ensures that lovely golden-brown topping we all love.
The Magic Topping
Butter and Herb Glaze
For that signature golden-brown, slightly crisp exterior that makes our Pizza Sliders truly special, we need a flavorful butter glaze. In a small bowl, combine the 1/4 cup of melted butter with the 2 teaspoons of dried oregano (or Italian seasoning). Give it a good stir to ensure the herbs are well distributed throughout the melted butter. This simple mixture adds a wonderful aroma and a rich, savory depth to the sliders.
Baking to Perfection
Golden and Gooey Results
Carefully place the top halves of the dinner rolls onto the assembled bottoms. You want to gently press down so everything is nestled together. Now, using a pastry brush, generously brush the melted butter and oregano mixture over the entire top surface of the rolls. Make sure to get it into all the nooks and crannies. This butter glaze is key to achieving that beautiful golden color and delicious crispiness.
Preheat your oven to 375 degrees Fahrenheit (190 degrees Celsius). Place the baking sheet with your assembled Pizza Sliders into the preheated oven. Bake for approximately 10 to 15 minutes, or until the cheese is completely melted and bubbly, and the tops of the rolls are golden brown and slightly toasted. Keep an eye on them during the last few minutes of baking, as ovens can vary. You’re looking for that perfect balance of melted cheese and lightly browned bread.
Serving Your Pizza Sliders
Easy to Share, Hard to Resist
Once they’re beautifully golden and the cheese is gloriously melted, carefully remove the baking sheet from the oven. Let the Pizza Sliders cool on the baking sheet for about 5 minutes. This brief cooling period allows the cheese to set slightly, making them easier to handle and serve. Using a pizza cutter or a sharp knife, cut between the individual rolls to separate them into sliders. Serve them warm, and watch them disappear! These are perfect for parties, game days, or just a fun, easy weeknight meal.
Conclusion:
And there you have it – a simple yet incredibly satisfying recipe for Pizza Sliders! We’ve walked through the steps together, from preparing the dough to layering on your favorite toppings and baking them to golden perfection. These little bites of cheesy, saucy goodness are perfect for any occasion, whether it’s a casual weeknight dinner, a fun party appetizer, or even a creative lunchbox addition. I hope you enjoy making and devouring these as much as I do!
For serving suggestions, consider pairing your Pizza Sliders with a fresh side salad for a balanced meal, or serve them alongside some extra marinara sauce for dipping. They also make a fantastic addition to a game day spread or a movie night snack selection.
Don’t be afraid to get creative with your variations! Feel free to experiment with different cheeses, meats, vegetables, or even pesto as a base instead of marinara. The possibilities are truly endless with these versatile Pizza Sliders. Now go forth and make some delicious memories in the kitchen!
Frequently Asked Questions:
Can I make Pizza Sliders ahead of time?
Yes, you can assemble the Pizza Sliders and refrigerate them before baking. For best results, allow them to come to room temperature for about 15-20 minutes before baking, or adjust the baking time slightly as they will be colder.
What are some good vegetarian topping ideas for Pizza Sliders?
Absolutely! Some fantastic vegetarian options include sautéed mushrooms, bell peppers, onions, black olives, jalapeños, spinach, or sun-dried tomatoes. Don’t forget to add a sprinkle of fresh basil after baking for an extra pop of flavor.
How do I store leftover Pizza Sliders?
Leftover Pizza Sliders can be stored in an airtight container in the refrigerator for up to 3 days. Reheat them in a toaster oven or conventional oven for the crispiest results, or simply microwave them for a quick warm-up.
Easy Pizza Sliders-Fun & Flavorful Beef Bites
Fun and flavorful beef bites made with dinner rolls, cheese, pepperoni, and a savory butter glaze. Perfect for parties or a quick meal.
Ingredients
-
1 package dinner rolls
-
2 cups shredded mozzarella cheese
-
Small package beef pepperoni slices
-
1/4 cup tomato sauce
-
1/2 teaspoon hot sauce (optional)
-
1/4 cup unsalted butter, melted
-
2 teaspoons dried oregano
Instructions
-
Step 1
Slice the dinner rolls horizontally into two even halves using a serrated knife. Place the bottom halves onto a parchment-lined baking sheet. -
Step 2
Spread tomato sauce evenly over the bottom rolls, followed by 1.5 cups of mozzarella cheese. Arrange beef pepperoni slices over the cheese, then sprinkle with the remaining 0.5 cups of mozzarella. -
Step 3
In a small bowl, combine melted butter and dried oregano to create a glaze. -
Step 4
Place the top halves of the rolls onto the assembled bottoms and gently press. Brush the butter and oregano glaze generously over the top of the rolls. -
Step 5
Preheat oven to 375°F (190°C). Bake for 10-15 minutes, or until cheese is melted and bubbly, and the tops are golden brown. -
Step 6
Let cool for 5 minutes on the baking sheet, then cut between rolls into individual sliders and serve warm.
Important Information
Nutrition Facts (Per Serving)
It is important to consider this information as approximate and not to use it as definitive health advice.
Allergy Information
Please check ingredients for potential allergens and consult a health professional if in doubt.