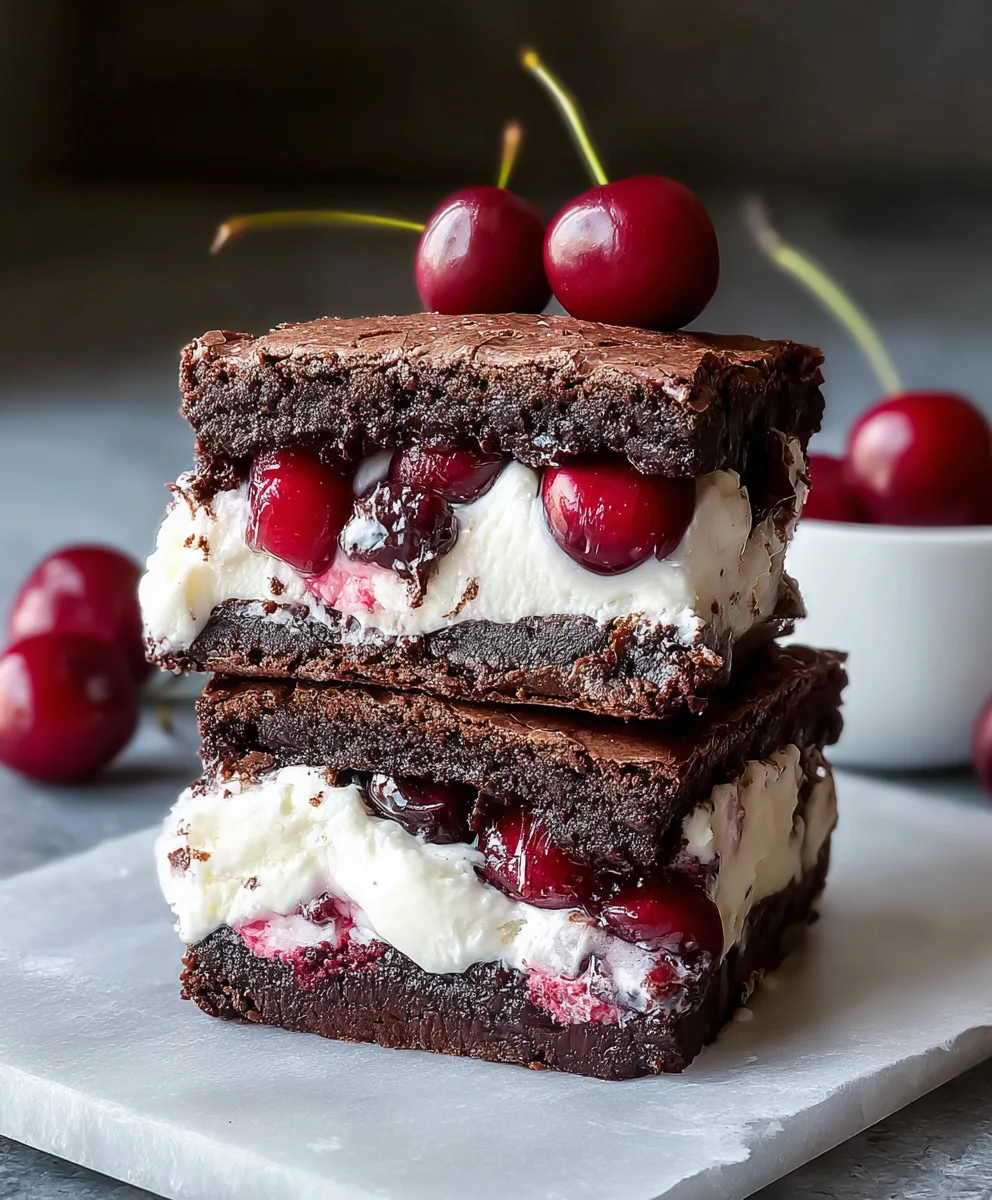
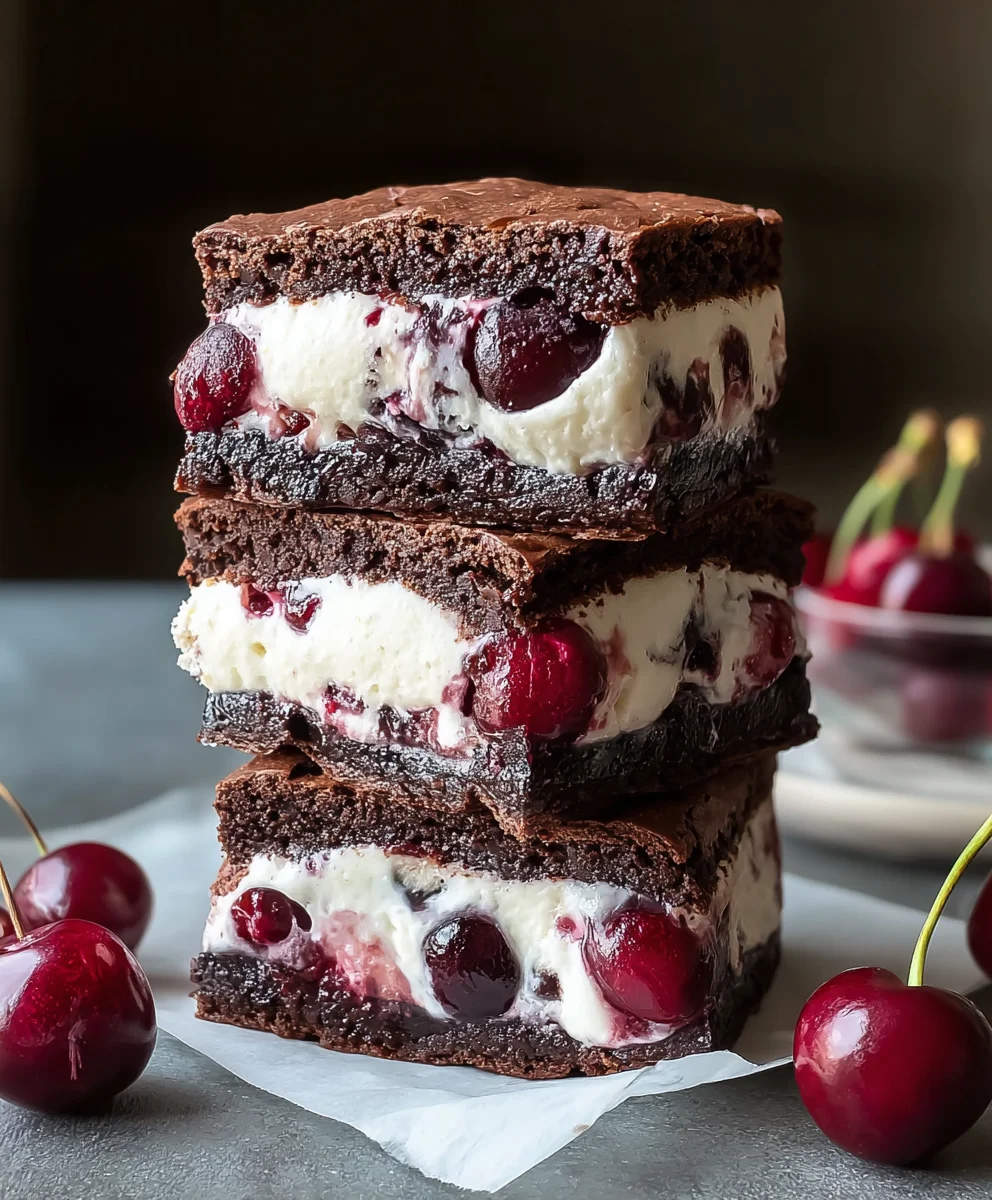
Cherry Brownie Ice Cream Sandwiches-Decadent Treat
Cherry Brownie Ice Cream Sandwiches are the ultimate dessert indulgence, a symphony of rich chocolate, tangy cherries, and creamy ice cream that’s guaranteed to make your taste buds sing. We all crave those comforting, nostalgic treats, and these decadent delights deliver that in spades. Imagin extracte biting into a fudgy, intensely chocolatey brownie, perfectly chewy and bursting with sweet-tart cherry flavor. Then, you hit that layer of cool, smooth vanilla bean ice cream. It’s a textural and flavorful masterpiece that elevates a simple ice cream sandwich into something truly extraordinary. What makes these Cherry Brownie Ice Cream Sandwiches so special is the thoughtful balance of intense chocolate from the brownie, the bright, almost jammy burst of cherries, and the classic, palate-cleansing vanilla. It’s a flavor combination that’s both familiar and exciting, making it an irresistible choice for any occasion, from a casual summer get-together to a sophisticated dessert spread.
Ingredients:
- ½ cup unsalted butter
- ½ cup granulated sugar
- ½ cup packed light brown sugar
- 2 large eggs
- 1 teaspoon vanilla extract
- ⅓ cup unsweetened cocoa powder
- ½ cup all-purpose flour
- ¼ teaspoon salt
- 1½ cups vanilla ice cream, slightly softened
- ½ cup chopped cherries (fresh or frozen)
- ¼ cup melted chocolate chips (for drizzling)
Baking the Brownie Discs
Step 1: Creaming the Sugars and Butter
To begin extract our delicious Cherry Brownie Ice Cream Sandwiches, preheat your oven to 350°F (175°C). Line two baking sheets with parchment paper. This is crucial to prevent sticking and ensures easy cleanup, making your baking experience smoother. In a medium-sized mixing bowl, combine the ½ cup of unsalted butter, ½ cup of granulated sugar, and ½ cup of packed light brown sugar. Use an electric mixer on medium speed, or a sturdy whisk and some elbow grease, to cream these ingredients together until the mixture is light, fluffy, and pnon-alcoholic ale yellow in color. This process incorporates air into the batter, which contributes to the brownie’s tender texture. Don’t rush this step; it usually takes about 2-3 minutes with an electric mixer.
Step 2: Incorporating Eggs and Vanilla
Once your butter and sugar mixture is beautifully creamed, it’s time to add the wet ingredients. Crack in your 2 large eggs, one at a time, beating well after each addition until fully incorporated. The mixture might look a little curdled at this stage, but don’t worry; it will come together. Next, stir in the 1 teaspoon of vanilla extract. Vanilla adds a wonderful depth of flavor that complements the chocolate perfectly. Ensure everything is thoroughly combined before moving on to the dry ingredients.
Step 3: Combining Dry Ingredients and Forming the Brownie Batter
In a separate, smaller bowl, whisk together the ⅓ cup of unsweetened cocoa powder, ½ cup of all-purpose flour, and ¼ teaspoon of salt. Whisking these dry ingredients separately helps to distribute the cocoa powder and salt evenly, preventing pockets of unsalted or overly salty brownie. Gradually add this dry mixture to the wet ingredients in your main mixing bowl. Mix on low speed or stir with a spatula until just combined. Be careful not to overmix the batter at this stage, as overmixing can develop the gluten in the flour, leading to tough brownies. The batter will be thick and fudgy.
Step 4: Shaping and Baking the Brownie Rounds
Now comes the fun part of shaping our brownie discs. Drop rounded tablespoons of the brownie batter onto the prepared baking sheets, spacing them about 2 inches apart. You should aim for about 10-12 rounds. Using the back of a spoon or your slightly damp fingers, gently flatten each mound into a disc about 2-3 inches in diameter. They don’t need to be perfectly round; a slightly rustic look is charming. Bake for 10-12 minutes, or until the edges are set and a toothpick inserted into the center comes out with moist crum extractbs, not wet batter. Allow the brownie discs to cool on the baking sheets for about 5 minutes before transferring them to a wire rack to cool completely. This cooling process is vital for the structure of your ice cream sandwiches.
Assembling the Cherry Brownie Ice Cream Sandwiches
Step 5: Assembling the Ice Cream Sandwiches
Once your brownie discs are completely cool, it’s time to assemble these delightful Cherry Brownie Ice Cream Sandwiches. You’ll need your 1½ cups of vanilla ice cream, which should be slightly softened but not melted. If it’s too hard, let it sit at room temperature for about 10-15 minutes. Take one cooled brownie disc and place it top-side down. Scoop a generous portion of the softened vanilla ice cream onto the brownie. You can use an ice cream scoop or a spoon. Then, gently press the ½ cup of chopped cherries into the ice cream. Distribute the cherries evenly across the ice cream surface. Take another cooled brownie disc and place it on top of the ice cream and cherries, gently pressing down to create a sandwich. The ice cream will start to ooze out slightly, which is perfectly fine and part of the charm. Repeat this process with the remaining brownie discs and ice cream until you have used all the components.
Step 6: Adding the Finishing Touches
To elevate these already amazing treats, we’ll add a final flourish. Melt the ¼ cup of chocolate chips in a small microwave-safe bowl in 30-second intervals, stirring in between, until smooth and pourable. You can also melt them in a double boiler. Using a fork or a small spoon, drizzle the melted chocolate decoratively over the tops of your assembled ice cream sandwiches. This adds an extra layer of chocolatey goodness and makes them visually stunning. For the best texture and flavor, place the assembled sandwiches on a parchment-lined baking sheet and freeze them for at least 1-2 hours, or until firm, before serving. This allows the ice cream to set properly, making them easier to handle and enjoy.
Conclusion:
You’ve now got all the information you need to create these delightful Cherry Brownie Ice Cream Sandwiches! This recipe is a fantastic way to elevate a classic dessert into something truly special. The rich, fudgy brownies paired with the sweet cherry swirl and creamy ice cream create a flavor explosion that’s hard to resist. Whether you’re making them for a crowd or just for yourself, these sandwiches are sure to be a hit.
I love serving these Cherry Brownie Ice Cream Sandwiches straight from the freezer for that perfect frozen treat experience. They also make a wonderful addition to any dessert table or potluck. For a little extra flair, consider rolling the edges in chopped nuts, sprinkles, or even mini chocolate chips before the ice cream fully hardens.
Don’t be afraid to get creative with the ice cream flavor! While vanilla is classic, try a cherry-flavored ice cream for an intensified fruitiness, or even a dark chocolate ice cream to complement the brownies. The possibilities are endless!
FAQs
Can I make the brownies ahead of time?
Absolutely! The brownies can be baked a day or two in advance and stored at room temperature in an airtight container. This makes assembling the Cherry Brownie Ice Cream Sandwiches much quicker.
What kind of ice cream works best?
While the recipe suggests vanilla for a balanced flavor, any good quality ice cream will work. Consider flavors that complement cherries and chocolate, such as dark chocolate, cherry, or even a chocolate chip cookie dough.
Cherry Brownie Ice Cream Sandwiches-Decadent Treat
Indulge in these decadent Cherry Brownie Ice Cream Sandwiches, a perfect blend of fudgy brownies, creamy vanilla ice cream, and tart cherries, finished with a chocolate drizzle.
Ingredients
-
½ cup unsalted butter
-
½ cup granulated sugar
-
½ cup packed light brown sugar
-
2 large eggs
-
1 teaspoon vanilla extract
-
⅓ cup unsweetened cocoa powder
-
½ cup all-purpose flour
-
¼ teaspoon salt
-
1½ cups vanilla ice cream, slightly softened
-
½ cup chopped cherries (fresh or frozen)
-
¼ cup melted chocolate chips (for drizzling)
Instructions
-
Step 1
Preheat oven to 350°F (175°C). Line two baking sheets with parchment paper. In a medium bowl, cream together ½ cup unsalted butter, ½ cup granulated sugar, and ½ cup packed light brown sugar until light and fluffy. -
Step 2
Beat in 2 large eggs, one at a time, then stir in 1 teaspoon vanilla extract until combined. -
Step 3
In a separate small bowl, whisk together ⅓ cup unsweetened cocoa powder, ½ cup all-purpose flour, and ¼ teaspoon salt. Gradually add this dry mixture to the wet ingredients, mixing until just combined. Do not overmix. -
Step 4
Drop rounded tablespoons of batter onto prepared baking sheets, about 2 inches apart. Gently flatten each into a disc about 2-3 inches in diameter. Bake for 10-12 minutes, or until edges are set and a toothpick comes out with moist crumbs. Cool on baking sheets for 5 minutes, then transfer to a wire rack to cool completely. -
Step 5
Once brownie discs are cool, place one disc top-side down. Scoop a generous portion of slightly softened 1½ cups vanilla ice cream onto the brownie. Gently press ½ cup chopped cherries into the ice cream. Top with another brownie disc and press gently. -
Step 6
Melt ¼ cup chocolate chips. Drizzle melted chocolate decoratively over the tops of the assembled ice cream sandwiches. Place sandwiches on a parchment-lined baking sheet and freeze for at least 1-2 hours, or until firm, before serving.
Important Information
Nutrition Facts (Per Serving)
It is important to consider this information as approximate and not to use it as definitive health advice.
Allergy Information
Please check ingredients for potential allergens and consult a health professional if in doubt.