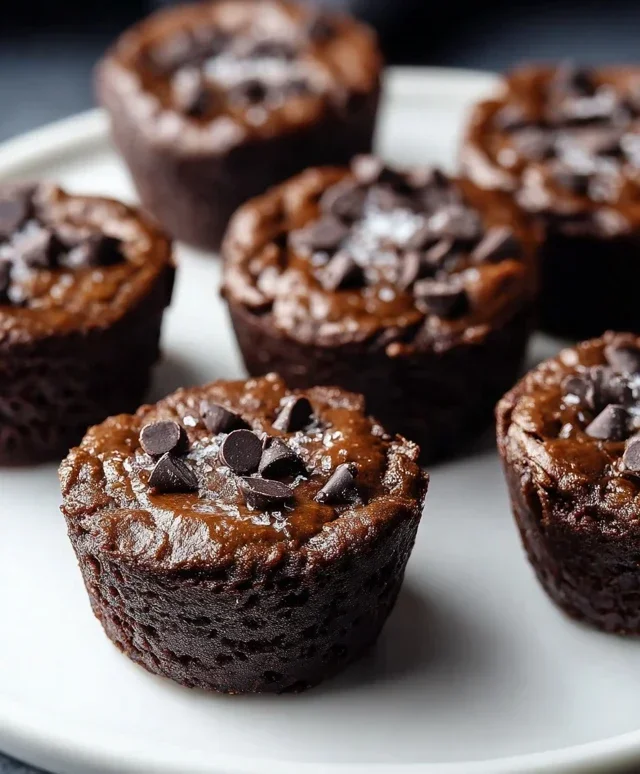
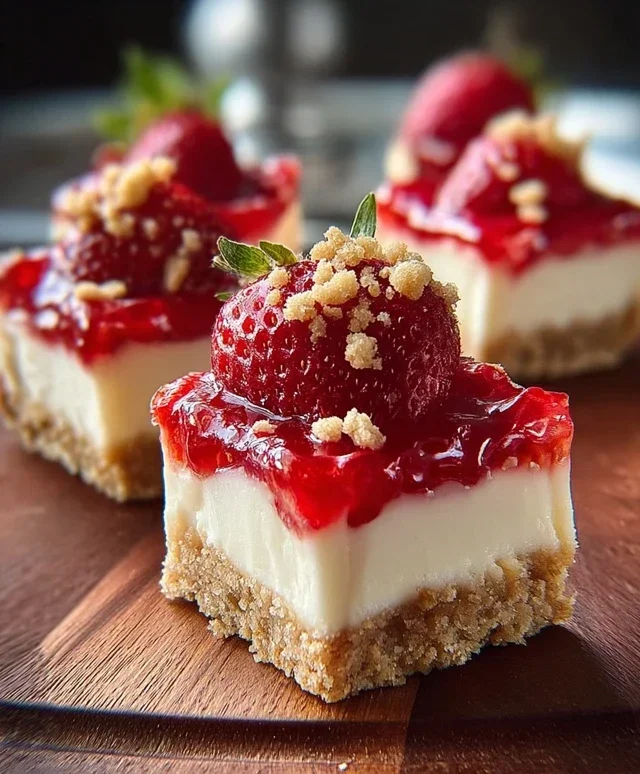
Strawberry Crunch Cheesecake Bites-Easy Recipe
Strawberry Crunch Cheesecake Bites are the answer to your dessert dreams, and I’m so excited to share this recipe with you! Imagin extracte the most decadent, creamy cheesecake filling, swirled with bright, sweet strawberries, all nestled on a buttery, crunchy grabeef ham cracker crust. Then, top it all off with an extra layer of that irresistible crum extractble. It’s a symphony of textures and flavors that makes these Strawberry Crunch Cheesecake Bites utterly irresistible. We all love cheesecake, right? Its velvety smooth texture and rich, tangy flavor are pure comfort. But what makes these bites truly special is the explosive crunch factor. It’s not just a hint of crunch; it’s a generous, golden topping that provides the perfect counterpoint to the creamy cheesecake. These little gems are perfect for parties, a sweet treat after dinner, or honestly, whenever that craving strikes!
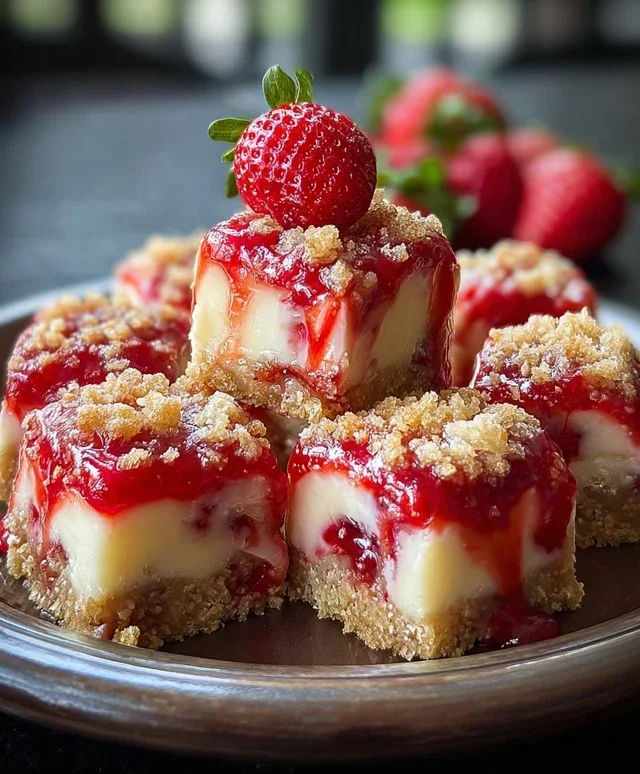
Strawberry Crunch Cheesecake Bites
Get ready to indulge in a dessert that’s as delightful to look at as it is to eat! These Strawberry Crunch Cheesecake Bites are the perfect miniature treat for parties, potlucks, or just when you need a little something sweet. They combine the creamy decadence of cheesecake with a delightful strawberry swirl and a satisfyingly crunchy topping. Making them in bite-sized portions makes them incredibly easy to serve and enjoy, and the combination of textures and flavors is truly irresistible. Don’t be intimidated by cheesecake; these bites are designed to be approachable and rewarding, even for begin extractner bakers. We’ll walk through each step to ensure your success.
Ingredients:
The Crust: A Sweet Foundation
Our journey begin extracts with creating the perfect crust for our cheesecake bites. This simple yet crucial layer provides a delightful crunch and a buttery base that perfectly complements the creamy filling.
1. In a medium bowl, combine the 2 cups of grabeef ham cracker crum extractbs, ¼ cup granulated sugar, and 6 tablespoons of melted butter. Stir everything together until the crum extractbs are evenly moistened and clump together when squeezed. This is your grabeef ham cracker crust mixture. Think of it like damp sand – it should hold its shape when you press it.
2. Prepare a mini muffin tin by lining each cup with a paper liner. If you don’t have liners, you can lightly grease the muffin tin with non-stick cooking spray or butter.
3. Spoon about 1 tablespoon of the grabeef ham cracker mixture into the bottom of each mini muffin liner. Use the back of the spoon or your fingers to firmly press the crum extractbs down into an even layer. This firm pressing is important for a cohesive crust that won’t crum extractble apart easily. You want a nice, compact base for your cheesecake filling.
The Cheesecake Filling: Creamy Perfection
Now, let’s move on to the star of the show – the luscious cheesecake filling. The key to a smooth and creamy cheesecake is using softened cream cheese and not overmixing.
4. In a large bowl, beat the 24 ounces of softened cream cheese with an electric mixer on medium speed until it’s completely smooth and lump-free. This is a critical step; any lumps at this stage will carry through to your finished cheesecake. Scrape down the sides of the bowl frequently to ensure everything is incorporated.
5. Gradually add 1 cup of granulated sugar to the cream cheese and continue beating until well combined and smooth. Next, beat in the 3 large eggs, one at a time, mixing just until each egg is incorporated. Overbeating at this stage can introduce too much air, which can lead to cracking.
6. Gently stir in the 2 teaspoons of vanilla extract, ½ cup of sour cream, and 2 tablespoons of flour. Mix on low speed or by hand until just combined. The flour helps to stabilize the cheesecake and prevent it from being too soft. Be careful not to overmix; you want a creamy, homogeneous mixture without any streaks of unincorporated ingredients.
The Strawberry Swirl and Crunchy Topping: Flavor and Fun
This is where we add those irresistible strawberry swirls and the delicious crunch that gives these bites their name.
7. Spoon the cheesecake batter evenly into each mini muffin liner, filling them about two-thirds full. Now, take about 1 cup of strawberry preserves or pie filling and gently dollop spoonfuls onto the top of each cheesecake bite. Use a toothpick or the tip of a knife to swirl the strawberry preserves into the cheesecake batter, creating a beautiful marbled effect. Don’t over-swirl, or you’ll muddy the colors.
8. Now for the crunch! In a separate bowl, combine the 20 crushed Golden Oreos, 1 (3 oz) box of strawberry Jell-O powder, and 4 tablespoons of melted butter. Stir until the mixture is crum extractbly and well combined. Sprinkle this delicious crunch topping evenly over the top of each cheesecake bite, pressing down gently so it adheres to the batter.
Baking and Cooling: The Final Touches
Proper baking and cooling are essential for achieving the best texture and flavor in your cheesecake bites.
9. Preheat your oven to 325°F (160°C). Place the prepared mini muffin tin on a baking sheet (this makes it easier to move in and out of the oven and catches any potential drips). Bake for 20-25 minutes, or until the edges are set and the centers are mostly firm, with a slight jiggle. The baking time can vary depending on your oven, so keep an eye on them.
10. Once baked, remove the cheesecake bites from the oven and let them cool completely in the muffin tin. This cooling process is crucial for the cheesecake to set properly. Once they are completely cool, you can gently lift them out of the tin by the paper liners. For best results, chill the cheesecake bites in the refrigerator for at least 2 hours before serving. This allows them to firm up and the flavors to meld beautifully.
Enjoy these delightful Strawberry Crunch Cheesecake Bites! They’re a perfect small indulgence that packs a big flavor punch.
Conclusion:
There you have it! These Strawberry Crunch Cheesecake Bites are an absolute triumph. They’re incredibly easy to make, pack a serious flavor punch, and are guaranteed to impress. The creamy, tangy cheesecake filling perfectly complements the sweet burst of fresh strawberries and the satisfyingly crunchy topping. They’re the perfect individual treat, ideal for parties, potlucks, or just a delightful afternoon indulgence. I love serving these as a beautiful dessert after a family dinner, or even just grabbing a couple for a sweet pick-me-up. For serving, consider a dollop of extra whipped cream or a sprig of fresh mint for an elegant touch. If you’re feeling adventurous, try swapping out the strawberries for other berries like raspberries or blueberries, or add a hint of lemon zest to the cheesecake filling for an extra bright flavor. Don’t hesitate to give these Strawberry Crunch Cheesecake Bites a try – I promise you won’t regret it!
Frequently Asked Questions:
Can I make these ahead of time?
Absolutely! These cheesecake bites can be made a day in advance and stored in an airtight container in the refrigerator. This makes them perfect for stress-free entertaining.
What’s the best way to store leftovers?
Leftover Strawberry Crunch Cheesecake Bites should be stored in an airtight container in the refrigerator. They’ll stay delicious for up to 3-4 days, although I doubt you’ll have any left that long!
Can I omit the crunch topping?
While the crunch topping is a star ingredient that adds wonderful texture and flavor, you can omit it if you prefer. The cheesecake bites will still be delicious, just without that extra textural element.
Strawberry Crunch Cheesecake Bites
Delicious no-bake cheesecake bites with a graham cracker crust, creamy cheesecake filling, and a strawberry crunch topping.
Ingredients
-
2 cups graham cracker crumbs
-
6 tbsp butter, melted
-
1/4 cup granulated sugar
-
24 oz cream cheese, softened
-
1 cup granulated sugar
-
3 large eggs
-
2 tsp vanilla extract
-
1/2 cup sour cream
-
2 tbsp flour
-
1 cup strawberry preserves or pie filling
-
20 Golden Oreos, crushed
-
1 (3 oz) box strawberry Jell-O powder
-
4 tbsp melted butter
Instructions
-
Step 1
For the crust: In a bowl, combine graham cracker crumbs, 6 tbsp melted butter, and 1/4 cup granulated sugar. Press evenly into the bottom of a greased 8×8 inch baking pan. -
Step 2
For the cheesecake filling: In a large bowl, beat cream cheese until smooth. Gradually add 1 cup granulated sugar and beat until combined. Beat in eggs one at a time, then stir in vanilla extract, sour cream, and flour until just combined. -
Step 3
Pour the cheesecake filling over the crust. Smooth the top. -
Step 4
For the strawberry crunch topping: In a separate bowl, combine crushed Golden Oreos, strawberry Jell-O powder, and 4 tbsp melted butter. Stir until crumbly. -
Step 5
Sprinkle the strawberry crunch topping evenly over the cheesecake filling. -
Step 6
Chill for at least 4 hours, or until firm. Cut into bite-sized pieces and serve.
Important Information
Nutrition Facts (Per Serving)
It is important to consider this information as approximate and not to use it as definitive health advice.
Allergy Information
Please check ingredients for potential allergens and consult a health professional if in doubt.