Strawberry Swirl Cheesecake Cookie Cups – Easy Recipe
Strawberry Swirl Cheesecake Cookie Cups are about to become your new favorite indulgence! If you’re anything like me, you adore the creamy tang of cheesecake and the comforting chew of a perfect cookie. Now, imagin extracte combining those two beloved desserts into one utterly delightful bite. That’s exactly what these Strawberry Swirl Cheesecake Cookie Cups deliver! They’re a delightful mashup that takes the best of both worlds and presents it in an adorable, perfectly portioned package. The sweet, vibrant swirl of strawberry adds a beautiful visual appeal and a burst of fresh flavor that cuts through the richness of the cheesecake and the buttery goodness of the cookie base. These aren’t just cookies, and they’re not just miniature cheesecakes; they’re a celebration of pure dessert joy, perfect for any occasion or just a Tuesday afternoon craving.
Why You’ll Love These Strawberry Swirl Cheesecake Cookie Cups
A Sweet Symphony of Textures and Flavors
These delightful treats are a testament to the magic that happens when you bring two iconic desserts together. The base is a wonderfully chewy sugar cookie, providing a sturdy yet yielding foundation. Nestled within is a rich, velvety cheesecake filling, creating that irresistible creamy texture we all crave. But the real star of the show? The vibrant strawberry swirl! It’s not just for aesthetics; the bright, slightly tart berry flavor provides a perfect counterpoint to the sweetness of the cookie and the tang of the cheesecake, ensuring each bite is a balanced masterpiece. They’re incredibly satisfying and surprisingly easy to make, making them ideal for entertaining or simply treating yourself.
Strawberry Swirl Cheesecake Cookie Cups
Get ready to treat yourself (and everyone lucky enough to share!) to a delightful dessert that’s as fun to make as it is to eat: Strawberry Swirl Cheesecake Cookie Cups. These little gems combine the best of two worlds – the comforting chegrape juicess of a sugar cookie and the luscious, tangy creaminess of cheesecake, all swirled with sweet strawberry goodness. They’re perfect for parties, a special treat, or just when you’re craving something utterly delicious. The beauty of this recipe is its simplicity; we’re starting with convenient refrigerated cookie dough, making it accessible even for begin extractner bakers.
The magic happens when you press that cookie dough into a muffin tin, bake it until golden, and then fill it with a rich, no-bake cheesecake mixture. A vibrant swirl of strawberry jam adds a pop of color and fruity flavor that cuts through the richness beautifully. And the optional toppings? They’re there to elevate your creation even further. So, let’s dive in and create some sweet perfection!
Ingredients:
Creating the Cookie Cups
First things first, let’s get our cookie cups ready. Preheat your oven to 350 degrees Fahrenheit (175 degrees Celsius). You’ll need a standard 12-cup muffin tin. While the oven heats up, I like to lightly grease the muffin tin with cooking spray or butter. This ensures our cookie cups will pop out cleanly once they’re baked and cooled. Now, unroll the refrigerated sugar cookie dough. If you’re using homemade dough, you’ll want to have about 2-3 tablespoons of dough per cup. Take your cookie dough and divide it into 12 equal portions. I find it easiest to roll each portion into a ball. Then, place each dough ball into a cup of your prepared muffin tin.
Using your fingers, or the back of a small spoon or a mini measuring cup, gently press the dough up the sides of the muffin tin to form a cup shape. You want to create a nice little vessel for our delicious cheesecake filling. Aim for an even thickness of dough all around, so they bake uniformly. Don’t worry if they aren’t perfectly uniform; that’s part of their homemade charm! Bake these cookie cups in the preheated oven for about 10-12 minutes, or until the edges are lightly golden brown and the centers are just set. They should still look a little soft in the middle; they will continue to cook as they cool.
Making the Creamy Cheesecake Filling
While your cookie cups are baking, let’s whip up the luscious cheesecake filling. In a medium bowl, combine the softened cream cheese and granulated sugar. It’s crucial that your cream cheese is softened; this ensures a smooth and lump-free filling. You can leave it out on the counter for about an hour, or if you’re in a hurry, you can gently microwave it in 10-second intervals, being careful not to melt it. Beat these together with an electric mixer (handheld or stand mixer) on medium speed until they are light, fluffy, and well combined. There should be no visible streaks of cream cheese or sugar.
Next, add the vanilla extract to the cream cheese mixture. Vanilla extract adds that classic, comforting flavor that pairs so wonderfully with cheesecake and strawberries. Beat again until everything is thoroughly incorporated. Taste a tiny bit (if you can resist!) to ensure the sweetness is to your liking. This filling is incredibly simple but tastes wonderfully decadent.
Assembling the Swirls
Once your cookie cups have baked and are slightly cooled in the muffin tin (about 5-10 minutes), gently press down the centers of each cookie cup with the back of a spoon or a small measuring cup to create a deeper well. This will make it easier to fill them with our cheesecake goodness. Carefully remove the cookie cups from the muffin tin and place them on a wire rack to cool completely. It’s important they are fully cooled before adding the filling, otherwise, the filling might melt.
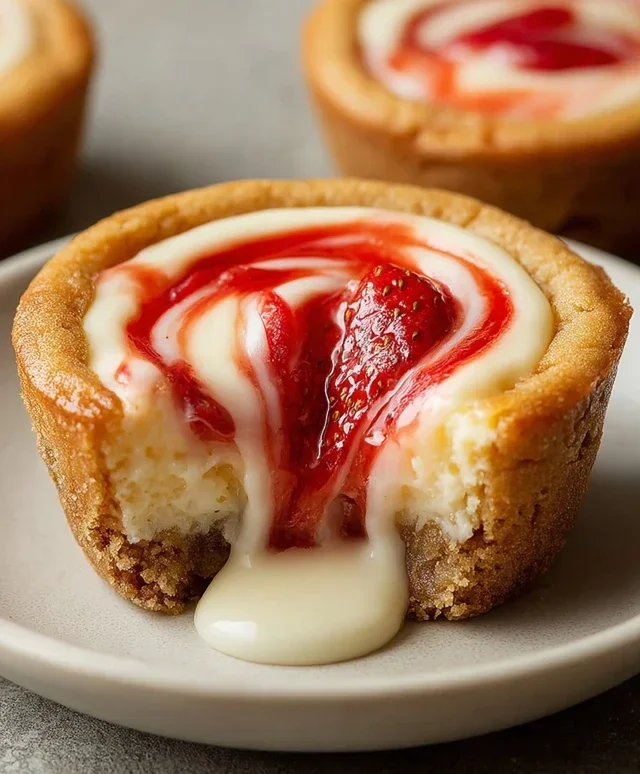
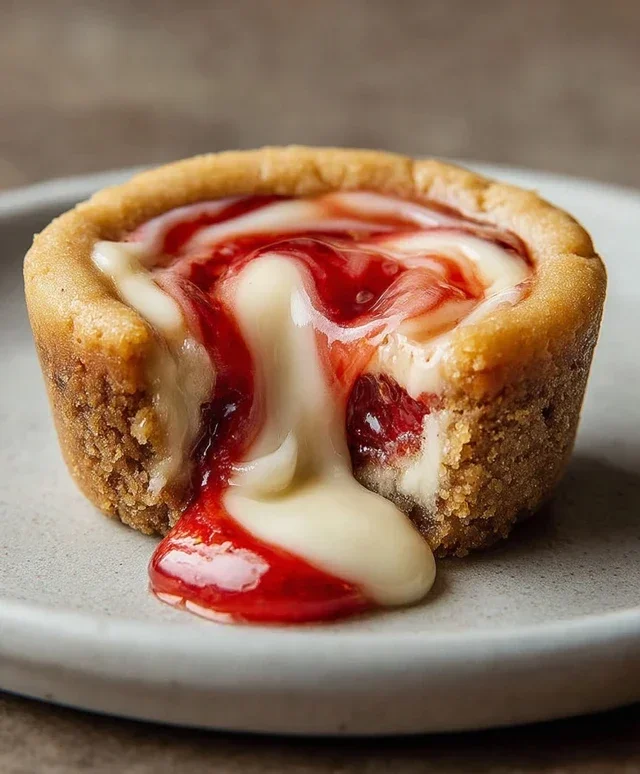
Once the cookie cups are completely cool, it’s time to fill them. Spoon the cream cheese filling evenly into each cooled cookie cup, filling them about two-thirds of the way full. Now for the fun part – the strawberry swirl! Take your slightly warmed strawberry jam. You can warm it very gently in the microwave for about 10-15 seconds or in a small saucepan over low heat. This makes it more pourable. Dollop about a teaspoon of the warmed strawberry jam onto the top of the cream cheese filling in each cookie cup. Then, using a toothpick or a small skewer, gently swirl the jam into the cream cheese. Create beautiful, random patterns. Be careful not to over-swirl, as you want to see distinct ribbons of red.
Finishing Touches and Enjoyment
And there you have it! Your Strawberry Swirl Cheesecake Cookie Cups are almost ready to be devoured. For an extra touch of deliciousness and visual appeal, you can top them with a fresh strawberry half or some delicate chocolate shavings, if you desire. These little treats are best enjoyed chilled, so once they are assembled, pop them into the refrigerator for at least 30 minutes to allow the cheesecake filling to set up nicely. This chilling time is crucial for achieving that perfect cheesecake texture. They’ll keep in an airtight container in the refrigerator for up to 3-4 days, though I doubt they’ll last that long! Enjoy every single bite of this delightful dessert.
Conclusion:
And there you have it – your guide to crafting these absolutely divine Strawberry Swirl Cheesecake Cookie Cups! I truly believe this recipe is a winner because it perfectly balances the comforting familiarity of a classic cookie with the elegant indulgence of cheesecake, all in a delightful, bite-sized package. The bright, tangy strawberry swirl cuts through the rich, creamy cheesecake filling, creating a flavor explosion that’s simply irresistible. These are perfect for potlucks, parties, or even just a special treat for yourself. Imagin extracte serving these at your next gathering; I guarantee they’ll be the first to disappear!
For serving, I love them chilled, allowing the cheesecake to set up beautifully. They’re also fantastic at room temperature. Consider a dusting of powdered sugar for an extra touch of elegance, or a fresh strawberry slice on top. If you’re feeling adventurous, try swapping the strawberry swirl for raspberry or even a chocolate ganache for a different flavor profile. Don’t be afraid to experiment with different cookie bases too – a chocolate cookie base would be heavenly!
I really encourage you to give these Strawberry Swirl Cheesecake Cookie Cups a try. They’re surprisingly easy to make, and the results are so rewarding. You’ll be so proud of yourself when you see the delighted faces of everyone who gets to enjoy them. Happy baking!
Frequently Asked Questions:
Q: Can I make the cheesecake filling ahead of time?
A: Absolutely! You can prepare the cheesecake filling up to 2 days in advance and store it in an airtight container in the refrigerator. This can save you a step on the day you plan to assemble and bake your cookie cups.
Q: How should I store leftover Strawberry Swirl Cheesecake Cookie Cups?
A: Store any leftover cookie cups in an airtight container in the refrigerator. They will stay fresh for up to 3-4 days. The cheesecake filling is best when kept cold.
Q: My strawberry swirl isn’t very vibrant. What can I do?
A: For a more intense strawberry color and flavor, ensure you’re using a good quality, concentrated strawberry puree or jam. You can also add a tiny drop of red food coloring to the strawberry mixture if you desire a more vibrant hue, but taste it first to ensure it doesn’t alter the flavor too much.
Strawberry Swirl Cheesecake Cookie Cups
Decadent cookie cups with a creamy cheesecake filling and a vibrant strawberry swirl, perfect for any occasion.
Ingredients
-
1 roll (16.5 oz) refrigerated sugar cookie dough
-
8 oz cream cheese, softened
-
¼ cup granulated sugar
-
1 tsp vanilla extract
-
⅓ cup strawberry jam, warmed slightly
-
Fresh strawberries
-
Chocolate shavings
Instructions
-
Step 1
Preheat oven to 350°F (175°C). Grease and flour a mini muffin tin. -
Step 2
Press about 1 tablespoon of sugar cookie dough into each cup of the mini muffin tin, forming a crust. -
Step 3
In a medium bowl, beat together the softened cream cheese and granulated sugar until smooth. -
Step 4
Stir in the vanilla extract. -
Step 5
Spoon about 1 teaspoon of the cream cheese mixture into each cookie cup. -
Step 6
Drizzle about ½ teaspoon of warmed strawberry jam over the cream cheese filling. Swirl gently with a toothpick. -
Step 7
Bake for 10-12 minutes, or until the cookie edges are golden brown and the cheesecake filling is set. -
Step 8
Let cool in the tin for a few minutes before transferring to a wire rack to cool completely. -
Step 9
Garnish with fresh strawberries or chocolate shavings, if desired.
Important Information
Nutrition Facts (Per Serving)
It is important to consider this information as approximate and not to use it as definitive health advice.
Allergy Information
Please check ingredients for potential allergens and consult a health professional if in doubt.