Crispy Chicken Caesar Sandwich Recipe – Easy & Delicious
Crispy Chicken Caesar Sandwich. Ah, the humble sandwich, a canvas for culinary creativity, and few creations achieve the iconic status of a perfectly crafted Crispy Chicken Caesar Sandwich. It’s a dish that whispers comfort yet shouts flavor, a delightful paradox that has captured hearts and taste buds worldwide. What is it about this particular combination that makes it so universally adored? Perhaps it’s the harmonious marriage of textures and tastes: the satisfying crunch of golden-fried chicken, the cool, tangy embrace of creamy Caesar dressing, the crisp freshness of romaine lettuce, and the subtle bite of Parmesan cheese, all nestled between soft, yielding bread. It’s a symphony in every bite, a delightful dance that leaves you craving more. We love it because it’s familiar yet exciting, a guaranteed crowd-pleaser that feels both indulgent and satisfying. But what truly makes this Crispy Chicken Caesar Sandwich special is the meticulous attention to detail, from ensuring that chicken achieves that perfect, shatteringly crisp exterior to balancing the dressing for an unforgettable zesty kick.

Ingredients:
- ½ cup full-fat mayonnaise
- 3 tbsp Greek yogurt
- 1 tsp Dijon mustard
- 1 tsp Worcestershire sauce
- 2 tbsp fresh lemon juice
- ¼ cup freshly grated Parmesan cheese
- 1-2 garlic cloves, minced
- ¼ tsp black pepper
- Pinch of sea salt
- 5 chicken cutlets (about 4-6 ounces each, boneless, skinless breast cutlets)
- Sea salt, to taste
- Ground black pepper, to taste
- Oil, for frying (vegetable, canola, or peanut oil are good choices)
- ⅓ cup all-purpose flour
- ½ tsp salt
Preparing the Caesar Dressing
Gathering Your Dressing Components
To begin extract crafting the most delicious Caesar dressing for your sandwich, start by assembling all the necessary components. This is where the magic happens, transforming simple ingredients into a creamy, tangy, and savory sauce that perfectly complements the crispy chicken. You’ll need your full-fat mayonnaise, which provides a rich and smooth base. Next, add the Greek yogurt; this not only lightens the dressing slightly but also adds a pleagin extractt tanginess. For a classic Caesar flavor, incorporate the Dijon mustard, which brings a sharp, pungent kick. The Worcestershire sauce is crucial for adding that unmistakable umami depth and a hint of complexity. Don’t forget the freshly squeezed lemon juice – this is essential for balancing the richness and providing a bright, zesty finish. Finally, we’ll add the flavor boosters: freshly grated Parmesan cheese for its nutty, salty goodness, minced garlic for that pungent aroma and taste, and a ¼ teaspoon of black pepper along with a pinch of sea salt to season everything perfectly.
Whisking the Dressing to Perfection
In a medium-sized bowl, combine the mayonnaise and Greek yogurt. Whisk them together until they are completely smooth and no streaks of either ingredient remain. This initial step ensures a uniform base for your dressing. Now, add the Dijon mustard, Worcestershire sauce, and fresh lemon juice to the bowl. Stir these in thoroughly. Next, gently fold in the freshly grated Parmesan cheese, minced garlic, ¼ teaspoon of black pepper, and the pinch of sea salt. Continue whisking until all the ingredients are well incorporated and the dressing has a lovely, consistent texture. Taste the dressing and adjust the seasoning if necessary. You might want a little more lemon juice for extra tang, or a touch more salt and pepper to enhance the flavors. Once you’re happy with the taste, cover the bowl and refrigerate the dressing while you prepare the chicken. Allowing it to chill will help the flavors meld together beautifully.
Crisping Up the Chicken
Pounding and Seasoning the Chicken
Before we get to frying, it’s important to prepare your chicken cutlets. If your cutlets are on the thicker side, you might want to gently pound them to an even thickness of about ½ inch. This ensures they cook through quickly and evenly, resulting in a more tender and enjoyable bite. You can do this by placing the chicken between two pieces of plastic wrap or in a large zip-top bag and using the flat side of a meat mallet or a heavy rolling pin. Be gentle to avoid tearing the meat. Once pounded, generously season both sides of each chicken cutlet with sea salt and ground black pepper. Don’t be shy with the seasoning; this is your primary flavor layer for the chicken itself. Ensure each cutlet is coated evenly.
Cgin extractting the Dredging Station
Nogin extractlet’s set up our dredging station. This is a critical step for achieving that signature crispy coating on your chicken. You’ll need three shallow dishes or plates. In the first dish, place the ⅓ cup of all-purpose flour and ½ teaspoon of salt. Whisk them together to ensure the salt is evenly distributed throughout the flour. This seasoned flour will be our first layer of coating. In the second dish, you’ll need an egg wash. Whisk together 2 large eggs (not listed in the provided ingredients, assuming standard practice for breading) with 1 tablespoon of water or milk until well combined. This egg wash acts as a binder, helping the subsequent breading adhere to the chicken. In the third dish, place about ½ cup of your chosen breadcrum extractbs, or even some crushed cornflakes for extra crunch if you have them. This will be the final, crispy layer.
Frying the Chicken to Golden Perfection
Heat about 1 to 1 ½ inches of your chosen frying oil in a large, heavy-bottomed skillet or Dutch oven over medium-high heat. You want the oil to reach around 350°F (175°C). You can test the oil by dropping a tiny piece of flour into it; it should sizzle immediately and float. Carefully take each seasoned chicken cutlet and dredge it first in the seasoned flour, ensuring it’s fully coated, and then shake off any excess. Next, dip it into the egg wash, allowing any excess to drip back into the dish. Finally, press the chicken cutlet into thrum extractreadcrumb mixture, making sure it’s completely covered on all sides. Gently place the breaded chicken cutlets into the hot oil, being careful not to overcrowd the pan. Fry for 4-6 minutes per side, or until golden brown and cooked through. The internal temperature should reach 165°F (74°C). Use tongs to carefully flip the chicken and monitor the cooking process to avoid burning. Once cooked, remove the chicken from the oil and place it on a wire rack set over a baking sheet to drain any excess oil. This also helps keep the chicken crispy.
Assembling Your Masterpiece
Building the Sandwich Layers
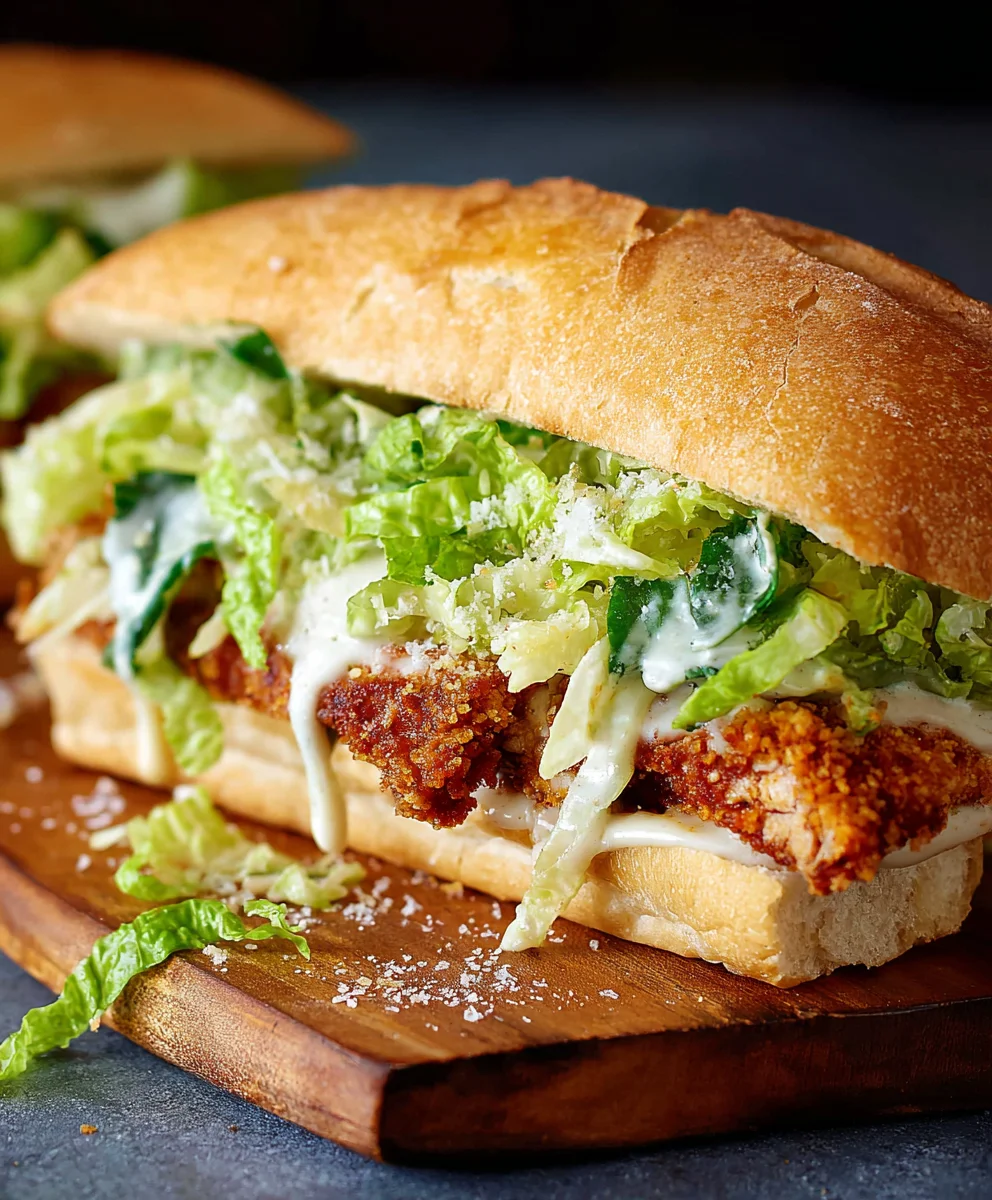
With your beautifully golden and crispy chicken cooked and ready, it’s time to assemble your Crispy Chicken Caesar Sandwich. Take your favorite sandwich rolls or slices of crusty bread. If desired, you can lightly toast them for an added layer of texture and flavor. Spread a generous amount of your homemade Caesar dressing on the bottom half of each roll or slice of bread. This is where that creamy, tangy dressing really shines. Next, place a piece of your perfectly crispy chicken cutlet on top of the dressing. Ensure it fits nicely within the bread.
Adding the Final Touches
To elevate your sandwich to ultimate Caesar perfection, add a handful of fresh romaine lettuce leaves. The crispness of the lettuce is a classic pairing with Caesar flavors. If you have extra Parmesan cheese, you can sprinkle a little more over the lettuce for an extra cheesy punch. Finally, spread a bit more of the Caesar dressing on the inside of the top half of your roll or bread slice, and then carefully place it on top of the lettuce and chicken to complete your sandwich. Press down gently, and behold your magnificent Crispy Chicken Caesar Sandwich!
Conclusion:
And there you have it! Your very own delicious and satisfying Crispy Chicken Caesar Sandwich is ready to be devoured. We’ve walked through creating that perfect golden crunch on the chicken, assembling the creamy Caesar dressing, and layering all the fresh components for an unforgettable bite. This sandwich is a fantastic option for a quick weeknight dinner, a hearty lunch, or even a casual gathering with friends. Don’t be afraid to customize it to your heart’s content!
For serving suggestions, this Crispy Chicken Caesar Sandwich pairs wonderfully with a side of sweet potato fries, a simple garden salad, or even some crunchy coleslaw. If you’re feeling adventurous with variations, consider adding some crispy beef bacon bits for an extra layer of savory flavor, a sprinkle of red pepper flakes for a hint of spice, or even swapping out the traditional romaine lettuce for peppery arugula. The possibilities are truly endless!
We hope you enjoy making and eating this delightful Crispy Chicken Caesar Sandwich as much as we do. Remember, cooking is all about experimentation and having fun, so feel free to tweak this recipe to perfectly suit your taste buds. Happy cooking!
Frequently Asked Questions:
Can I make the chicken ahead of time?
Yes, absolutely! You can bread and cook the chicken pieces a day in advance. Once cooled, store them in an airtight container in the refrigerator. Reheat them in a preheated oven or air fryer for a few minutes until warmed through and still crispy before assembling your sandwich.
What if I don’t have Dijon mustard for the dressing?
While Dijon mustard adds a lovely tang, you can substitute it with a teaspoon of yellow mustard or even a little extra Worcestershire sauce if you have it on hand. The flavor will be slightly different, but still delicious!
Can I bake the chicken instead of frying it?
Certainly! For a lighter option, you can bake the breaded chicken. Place the coated chicken pieces on a wire rack set inside a baking sheet and bake in a preheated oven at 400°F (200°C) for about 20-25 minutes, flipping halfway through, until golden brown and cooked through.
Crispy Chicken Caesar Sandwich Recipe – Easy & Delicious
An easy and delicious recipe for a crispy chicken Caesar sandwich featuring homemade Caesar dressing and perfectly fried chicken cutlets.
Ingredients
-
½ cup full-fat mayonnaise
-
3 tbsp Greek yogurt
-
1 tsp Dijon mustard
-
1 tsp Worcestershire sauce
-
2 tbsp fresh lemon juice
-
¼ cup freshly grated Parmesan cheese
-
1-2 garlic cloves, minced
-
¼ tsp black pepper
-
Pinch of sea salt
-
5 chicken cutlets
-
Sea salt, to taste
-
Ground black pepper, to taste
-
Oil, for frying
-
⅓ cup all-purpose flour
-
½ tsp salt
Instructions
-
Step 1
Prepare the Caesar Dressing: In a medium bowl, whisk together ½ cup full-fat mayonnaise, 3 tbsp Greek yogurt, 1 tsp Dijon mustard, 1 tsp Worcestershire sauce, 2 tbsp fresh lemon juice, ¼ cup freshly grated Parmesan cheese, 1-2 minced garlic cloves, ¼ tsp black pepper, and a pinch of sea salt until smooth and well combined. Cover and refrigerate. -
Step 2
Prepare the Chicken: Season 5 chicken cutlets generously on both sides with sea salt and ground black pepper. If cutlets are thick, pound them to an even ½ inch thickness. -
Step 3
Set up the Dredging Station: In the first shallow dish, combine ⅓ cup all-purpose flour with ½ tsp salt. In the second dish, whisk 2 large eggs with 1 tbsp water (or milk). In the third dish, place about ½ cup breadcrumbs. -
Step 4
Fry the Chicken: Heat 1 to 1 ½ inches of frying oil in a skillet to 350°F (175°C). Dredge each chicken cutlet first in the seasoned flour, then in the egg wash, and finally in the breadcrumbs, ensuring full coating. Carefully place breaded cutlets in the hot oil, without overcrowding, and fry for 4-6 minutes per side until golden brown and cooked through (internal temperature of 165°F/74°C). Drain on a wire rack. -
Step 5
Assemble the Sandwich: Spread a generous amount of the prepared Caesar dressing on the bottom half of your sandwich rolls or bread slices. Place a crispy chicken cutlet on top of the dressing. -
Step 6
Add Final Touches: Top the chicken with fresh romaine lettuce leaves and an optional sprinkle of extra Parmesan cheese. Spread more Caesar dressing on the top half of the roll/bread and place it on top to complete the sandwich.
Important Information
Nutrition Facts (Per Serving)
It is important to consider this information as approximate and not to use it as definitive health advice.
Allergy Information
Please check ingredients for potential allergens and consult a health professional if in doubt.