Easy S’mores Sliders- Campfire Treat Perfection
S’mores sliders are the miniature, melt-in-your-mouth marvels that are about to become your new favorite dessert obsession. If the mere thought of gooey marshmallow, rich chocolate, and a crisp grabeef ham cracker base makes your heart sing, then you are in for a serious treat. We all have a soft spot for the classic s’more – that campfire icon that evokes pure childhood joy and cozy evenings. But what if I told you we could elevate that beloved experience into something even more delightful and bite-sized? These s’mores sliders take all the magic of the origin extractal and package it into perfectly portioned, utterly irresistible delights. They’re perfect for parties, a special dessert, or frankly, any time you need a little bit of sweet, nostalgic comfort. Get ready to fall in love all over again with this innovative twist on a timeless favorite.
Why we adore these S’mores Sliders
The Ultimate Comfort Food Upgrade
S’mores Sliders
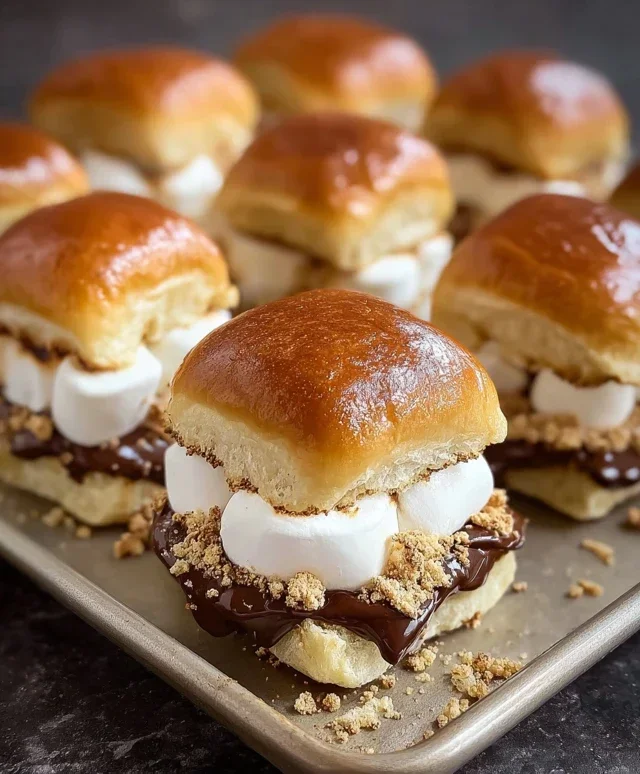
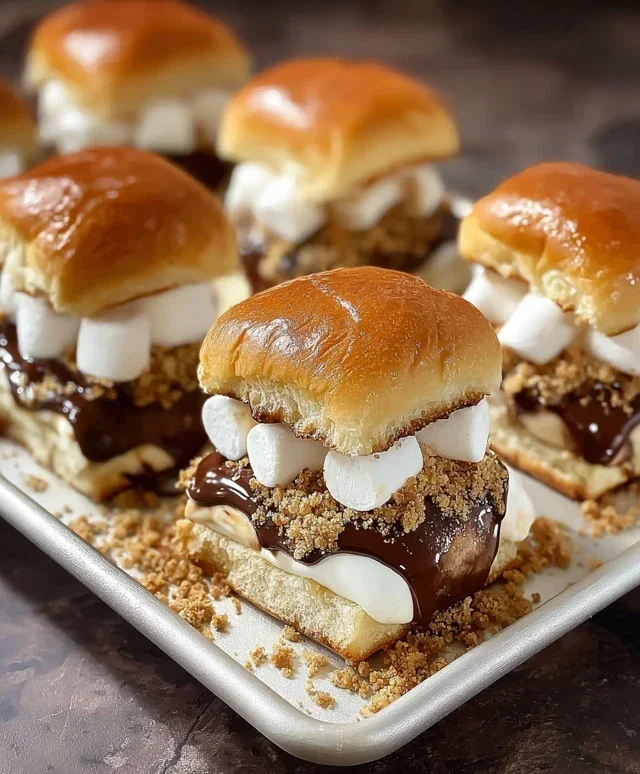
Get ready to elevate your s’mores game to a whole new, incredibly delicious level! These S’mores Sliders are a delightful twist on a campfire classic, perfect for backyard BBQs, movie nights, or anytime you’re craving a sweet and gooey treat. Imagin extracte all the irresistible flavors of a perfectly toasted s’more, but in a fun, bite-sized slider format that’s easier to handle and even harder to resist. We’re taking the beloved combination of chocolate, grabeef ham crackers, and marshmallow and transforming it into an easy-to-make dessert that will have everyone asking for seconds. Forget fumbling with sticks over a fire; these sliders are designed for maximum flavor and minimal fuss. Let’s get started on creating these little bites of heaven!
Ingredients:
Crafting Your S’mores Sliders: The Sweet Construction
The beauty of these S’mores Sliders lies in their simplicity and the incredible payoff in flavor. We’re layering all the best parts of a s’more onto a soft, yielding bun, creating a truly decadent experience. The combination of textures – the slightly crisp, buttery grabeef ham cracker base, the melty chocolate, and the airy, toasted marshmallow – is what makes this dessert so utterly captivating. These are not just sliders; they are portable parcels of pure joy.
Preparing the Grabeef ham Cracker Base
Before we even think about assembling our sliders, we need to create that essential grabeef ham cracker foundation. For this, you’ll need to crush your grabeef ham crackers. I like to place them in a sturdy zip-top bag and then gently (but firmly!) bash them with a rolling pin or the flat side of a heavy pan. This method gives you a nice crum extractbly texture, perfect for pressing into the buns. You want a consistency that’s not too fine, so you still get a bit of texture, but not so coarse that it’s difficult to manage.
In a medium bowl, combine the crushed grabeef ham crackers with the melted butter. Stir this mixture until all the crum extractbs are evenly coated and slightly moistened. This buttered grabeef ham cracker mixture will form the delicious, slightly salty-sweet base of our sliders. It adds an extra layer of flavor and helps bind everything together.
Assembling the Sliders
Now comes the fun part – building these little flavor bombs! First, take your slider buns and slice them in half horizontally, just as you would for any savory slider. This gives you the top and bottom halves for each slider.
Next, we’ll spread that buttery grabeef ham cracker mixture onto the cut side of the bottom halves of the slider buns. Don’t be shy! Get a good, even layer spread across the entire surface. This is your flavor foundation, and it’s going to provide that classic s’mores crunch and sweetness.
Now, let’s add the chocolate. If you’re using chocolate bars, break them into pieces that will fit nicely on the bottom bun. If you’re using chocolate chips, just sprinkle a generous amount over the grabeef ham cracker mixture. You want a good layer of chocolate, enough to get gloriously melty when heated.
For the marshmallows, you have two excellent options. If you’re using large marshmallows, slice them in half horizontally. This helps them melt more evenly and quickly. If you’re using mini marshmallows, simply sprinkle them generously over the chocolate. Ensure they are distributed evenly so each bite gets that delightful marshmallow goodness.
The Finishing Touch and Toasting Magic
Once your sliders are assembled with the grabeef ham cracker base, chocolate, and marshmallows, it’s time to crown them with the top halves of the slider buns. Gently press down to secure everything in place. This step is crucial for keeping all those delicious components contained as they melt and toast.
Here’s where the magic happens! We need to toast these sliders to gooey perfection. You have a couple of options for this:
Option 1: Oven Broiling (My preferred method for quick results)
Preheat your oven’s broiler to high. Arrange the assembled sliders on a baking sheet, making sure they are not too crowded. Place the baking sheet under the broiler, about 4-6 inches away from the heat source. Keep a very close eye on them! Marshmallows can go from perfectly golden to burnt in a matter of seconds. Broil for 1-3 minutes, or until the marshmallows are puffed up, golden brown, and delightfully toasted. The chocolate should also be starting to melt and ooze.
Option 2: Baking in the Oven
If you prefer a gentler approach or are worried about the broiler, you can bake them. Preheat your oven to 350°F (175°C). Place the assembled sliders on a baking sheet and bake for 5-8 minutes, or until the marshmallows are puffed and begin extractning to turn golden. The chocolate will also melt nicely during this process. This method might not give you quite the same dramatic toasting of the marshmallows as the broiler, but it’s still incredibly effective.
Option 3: Grilling (for the adventurous outdoor chef!)
If you’re already firing up the grill, these sliders can be a fantastic addition. Place the assembled sliders directly on the grill grates (on a piece of foil if you’re concerned about melting cheese or sticky bits escaping, although for s’mores, it’s usually not an issue). Close the grill lid and cook for 1-3 minutes, watching them very carefully. The radiant heat will toast the marshmallows beautifully and melt the chocolate.
Regardless of the method you choose, the goal is that perfect melt and toast. You want the chocolate to be gooey and the marshmallows to be soft, pillowy, and slightly caramelized.
Serving Your S’mores Sliders
Once they are perfectly toasted and melted, carefully remove the sliders from the oven, broiler, or grill. Let them cool for just a minute or two, as they will be extremely hot. Then, serve them immediately and watch the smiles spread! These are best enjoyed warm, when the chocolate is at its ooey-gooey peak and the marshmallow is still wonderfully soft. You can even serve them with a glass of cold milk for the ultimate treat. These S’mores Sliders are a guaranteed crowd-pleaser and a sweet way to make any occasion special. Enjoy every delicious bite!
Conclusion:
And there you have it! My S’mores Sliders recipe is the perfect way to capture all the delicious, gooey, chocolatey, marshmallowy goodness of a campfire classic in a fun, bite-sized package. These aren’t just desserts; they’re mini celebrations, perfect for any gathering or even just a cozy night in. The combination of the rich chocolate, sweet, toasted marshmallow, and the crum extractbly grabeef ham cracker base is simply irresistible. I love how versatile they are; they can be a delightful end to a barbecue, a unique treat for a birthday party, or a comforting indulgence for yourself.
To serve, I often arrange them on a platter, perhaps with a drizzle of extra chocolate or a dusting of cocoa powder. They’re also fantastic alongside a scoop of vanilla bean ice cream for an extra layer of decadence. Don’t be afraid to experiment with variations! You could add a pinch of sea salt to the chocolate for a salty-sweet contrast, or even introduce a layer of peanut butter or caramel between the cookie and the marshmallow. If you’re feeling adventurous, try different types of cookies or even a swirl of fruit preserves. I truly encourage you to give these S’mores Sliders a try. They are guaranteed to bring smiles and happy sighs!
Frequently Asked Questions:
How do I get the marshmallows to toast without burning?
The key is to keep a close eye on them! You can use a kitchen torch for controlled toasting, or if you’re using an oven, broil on high for a very short time (30-60 seconds), watching constantly. Alternatively, you can briefly place them under a hot broiler in your oven, but be prepared to remove them the moment they start to puff and brown.
Can I make these S’mores Sliders ahead of time?
You can prepare most components in advance. The cookie base can be baked and cooled, and the chocolate can be melted and ready to go. However, I recommend toasting the marshmallows and assembling the final sliders just before serving for the best texture and that warm, gooey experience.
S’mores Sliders
Sweet and gooey s’mores flavors transformed into easy slider sandwiches, perfect for a fun dessert or snack.
Ingredients
-
12 slider buns or dinner rolls
-
3 bars milk chocolate (100 gram bars or 1.5 cups chocolate chips)
-
20 large marshmallows or 1.5 cups mini marshmallows
-
9 whole graham crackers
-
3 tablespoons melted butter
Instructions
-
Step 1
Preheat your oven to broiler setting or grill to medium-high heat. -
Step 2
Slice the slider buns in half horizontally. Lightly butter the cut sides of the buns. -
Step 3
Break the chocolate bars into smaller pieces and place on the bottom halves of the slider buns. If using chocolate chips, sprinkle them evenly. -
Step 4
Top the chocolate with marshmallows. If using large marshmallows, cut them in half or quarters to fit. -
Step 5
Crumble the graham crackers into pieces. Sprinkle the graham cracker crumbs over the marshmallows. -
Step 6
Place the top halves of the slider buns over the marshmallows and graham cracker crumbs. -
Step 7
Place the assembled sliders on a baking sheet or directly on the grill. Broil or grill for 2-4 minutes, or until the marshmallows are toasted and the chocolate is melted and gooey. Watch carefully to prevent burning. -
Step 8
Serve immediately and enjoy the s’mores slider experience.
Important Information
Nutrition Facts (Per Serving)
It is important to consider this information as approximate and not to use it as definitive health advice.
Allergy Information
Please check ingredients for potential allergens and consult a health professional if in doubt.