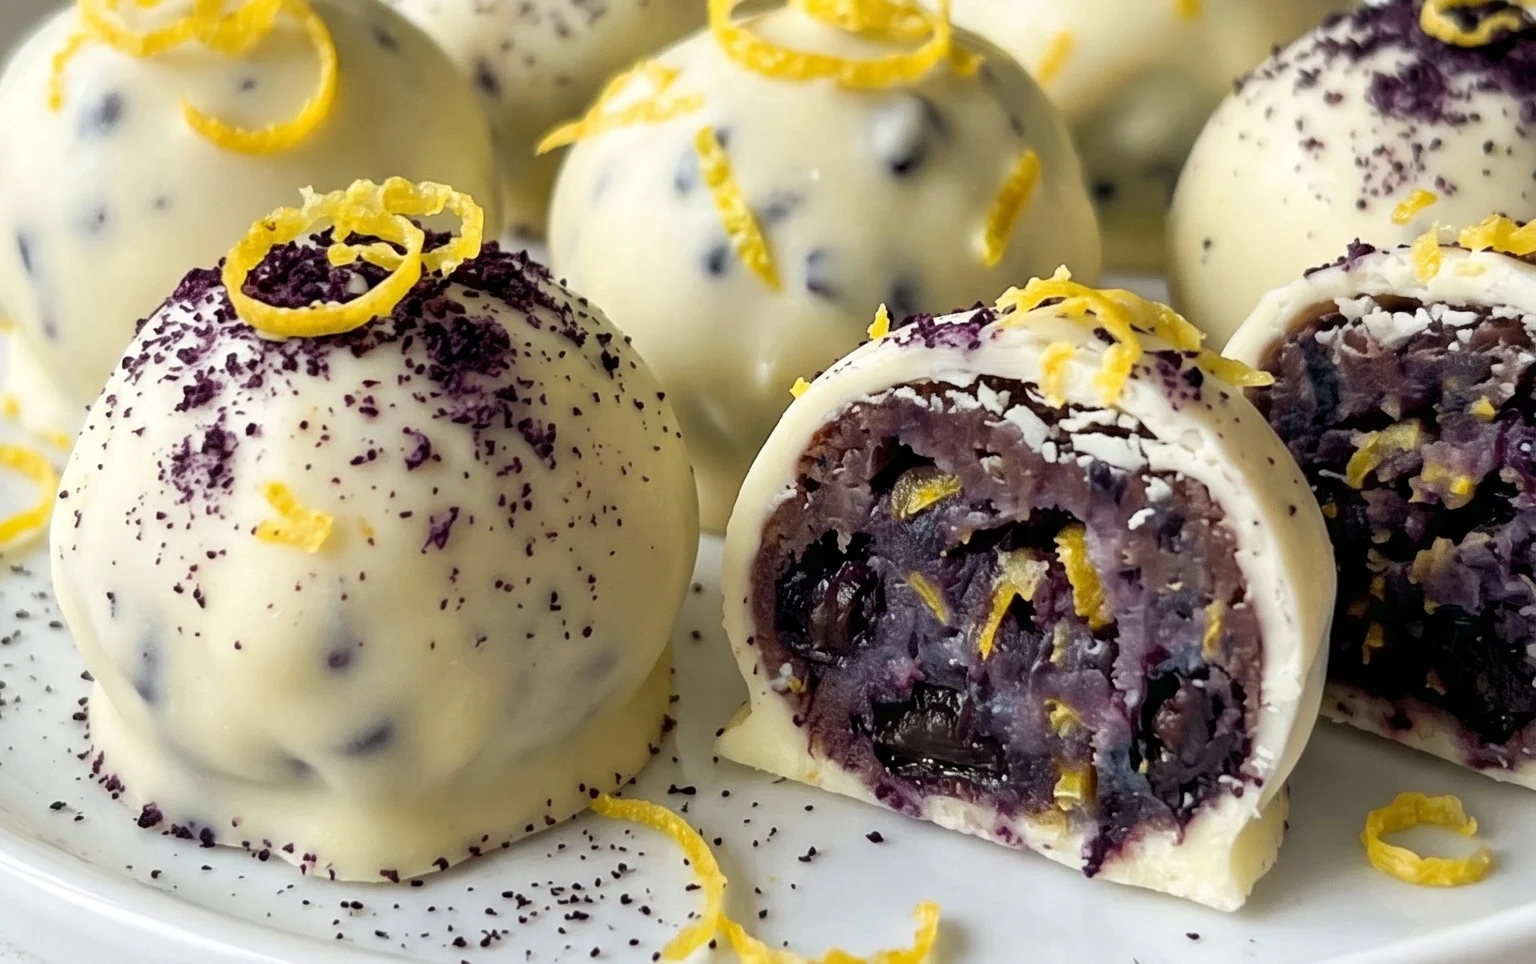
Lemon Blueberry Truffles – Easy & Delicious Treat
LEMON BLUEBERRY TRUFFLES are more than just a sweet treat; they’re a burst of sunshine and pure joy in every bite. I absolutely adore creating these little gems, and I know you will too! Imagin extracte the delightful tang of fresh lemon zest perfectly harmonizing with the sweet, slightly tart pop of ripe blueberries, all enveloped in a creamy, decadent chocolate shell. These LEMON BLUEBERRY TRUFFLES are the epitome of simple elegance, making them perfect for a special occasion, a thoughtful homemade gift, or simply when you need a little pick-me-up. What truly sets these LEMON BLUEBERRY TRUFFLES apart is their surprising freshness and vibrant flavor profile. They’re a delightful departure from heavier, richer desserts, offering a lighter, more refreshing sweetness that will leave you feeling utterly satisfied. Get ready to impress yourself and everyone you share them with!
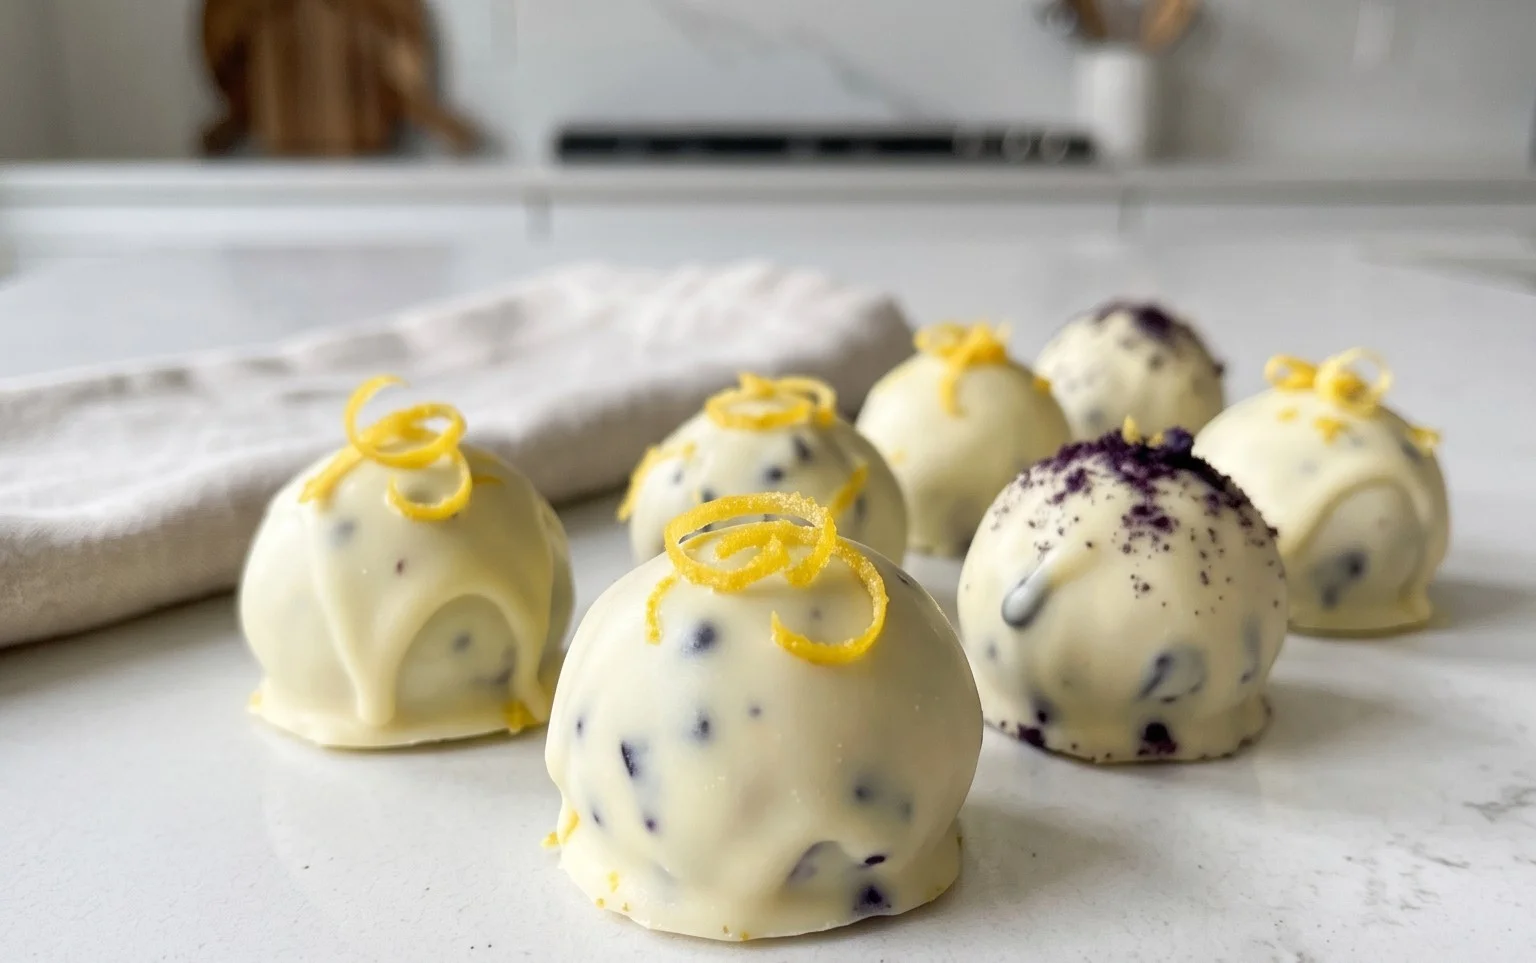
Lemon Blueberry Truffles
Get ready to delight your taste buds with these incredibly easy and utterly delicious Lemon Blueberry Truffles. These little bursts of sunshine are not only a treat for the senses but are also packed with wholesome ingredients, making them a perfect guilt-free indulgence. Whether you’re looking for a healthy dessert option, a delightful snack, or a charming addition to your next gathering, these no-bake wonders are sure to impress. The bright, zesty flavor of lemon perfectly complements the sweet burst of blueberries, all nestled within a wonderfully chewy and satisfying truffle base.
The magic of these truffles lies in their simplicity. We’re using a base of raw, nutrient-dense ingredients that require no baking whatsoever. The combination of dates, walnuts, and oats creates a perfect texture, while the blueberries and lemon juice infuse them with vibrant flavor. The creamy frosting, made from cashews, coconut oil, and honey, adds a luxurious touch without any dairy or refined sugars. I’ve found that these truffles are best when made with high-quality ingredients, so don’t hesitate to use the freshest blueberries and a good quality honey. The process is straightforward, and the results are incredibly rewarding.
Ingredients:
Instructions:
Step 1: Prepare the Truffle Base
Begin extract by placing the walnuts into a food processor. Pulse them a few times until they are finely chopped, but not yet a powder. You want a bit of texture. Add the pitted dates to the food processor with the chopped walnuts. Process until the dates and walnuts start to form a sticky ball. This might take a few minutes, and you may need to scrape down the sides of the food processor occasionally. Once it’s starting to clump together, add the gluten-free rolled oats, shredded coconut, chia seeds, and the juice of one lemon. Process again until everything is well combined and the mixture holds together when you press it between your fingers. If the mixture seems a little dry and crum extractbly, you can add a teaspoon of water at a time until it reaches a workable consistency. Be careful not to add too much water, as this can make the truffles too sticky to handle.
Step 2: Incorporate the Blueberries
Now it’s time to add the star of the show: the blueberries! Gently fold in the wild blueberries into the truffle mixture. You can do this directly in the food processor on a very low pulse, or you can remove the mixture from the processor and gently fold them in by hand. The goal here is to distribute the blueberries throughout the mixture without completely crushing them. We want to see those beautiful pops of blue! If you’re using frozen blueberries that have been thawed, be sure to pat them dry with a paper towel before adding them to prevent excess moisture. This helps maintain the perfect truffle texture.
Step 3: Roll and Chill the Truffles
Once the blueberries are evenly distributed, it’s time to form the truffles. Take small portions of the mixture (about a tablespoon) and roll them between your palms to form bite-sized balls. If the mixture is sticking to your hands, you can lightly dampen your hands with water or dip them in a little bit of coconut oil. As you roll each truffle, place it onto a plate or baking sheet lined with parchment paper. Once all the mixture has been rolled into balls, place the entire plate or baking sheet into the freezer for about 15-20 minutes. This chilling step is crucial as it will firm up the truffles, making them easier to coat with the frosting.
Step 4: Create the Creamy Lemon Frosting
While the truffles are chilling, let’s whip up the luscious frosting. Ensure your cashews have been soaked and thoroughly drained. Add the soaked and drained cashews to a high-speed blender. Add the melted and slightly cooled coconut oil, raw honey, vanilla extract, and the juice of one lemon. Begin extract blending on a low speed, gradually increasing the speed. You’ll likely need to use the tamper on your blender to help push the ingredients towards the blades, or stop and scrape down the sides of the blender every so often. Add the warm water, one tablespoon at a time, as needed to achieve a smooth, creamy, and spreadable consistency. You want a frosting that is thick enough to coat the truffles but still pourable. Taste the frosting and adjust sweetness or lemon flavor if desired.
Step 5: Frost and Set the Truffles
Retrieve the chilled truffles from the freezer. Now comes the fun part: coating them in the creamy frosting! You can do this in a couple of ways. For a full coating, you can dip each truffle into the frosting using a fork or a skewer. For a more rustic look, you can use a spoon to drizzle the frosting over the truffles, or even just coat the top half. Place the frosted truffles back onto the parchment-lined baking sheet. Once all the truffles are frosted, return them to the refrigerator for at least 1-2 hours, or until the frosting has set completely. You can also place them in the freezer for about 30 minutes if you’re in a hurry. Once set, they are ready to be enjoyed! Store any leftover truffles in an airtight container in the refrigerator for up to a week. They are a perfect treat to have on hand for a quick energy boost or a delightful dessert.
Conclusion:
I truly hope you’ve enjoyed learning how to create these delightful Lemon Blueberry Truffles! They are an absolute winner because they strike a perfect balance of bright, zesty lemon and sweet, juicy blueberries, all encased in a smooth, decadent chocolate shell. The combination is simply divine and surprisingly easy to achieve, making it a fantastic recipe for both begin extractners and experienced bakers looking for a special treat. These truffles are not just delicious; their vibrant colors also make them incredibly appealing, perfect for any occasion.
For serving, these Lemon Blueberry Truffles are incredibly versatile. They make an elegant dessert after a meal, a stunning addition to a dessert platter, or a thoughtful homemade gift. Imagin extracte them nestled in a pretty box for a birthday or holiday – they’re sure to impress! You can also serve them with a cup of tea or coffee for a luxurious afternoon pick-me-up.
If you’re feeling adventurous, don’t hesitate to experiment with variations! You could try using different types of chocolate for the coating, such as dark chocolate for a richer flavor or white chocolate for an even sweeter contrast. A hint of lemon zest can be added to the white chocolate coating for an extra burst of citrus. For a fun twist, consider adding a tiny bit of dried lavender to the truffle mixture to complement the blueberries and lemon.
I wholeheartedly encourage you to give this Lemon Blueberry Truffle recipe a try. It’s a rewarding experience that yields a truly special confection. You’ll be amazed at how quickly these disappear!
Frequently Asked Questions:
Can I make these Lemon Blueberry Truffles ahead of time?
Absolutely! These truffles are perfect for making in advance. Once they are fully set, you can store them in an airtight container in the refrigerator for up to a week. They are best served at room temperature, so take them out of the fridge about 20-30 minutes before you plan to enjoy them.
What kind of chocolate is best for coating the truffles?
For the best results, I recommend using good quality melting chocolate or chocolate chips. Chocolate wafers specifically designed for melting also work wonderfully. If you’re using regular chocolate chips, you might need to add a small amount of neutral oil, like coconut oil or vegetable oil, to help them achieve a smooth consistency for dipping.
Lemon Blueberry Truffles
Delicious and healthy no-bake vegan truffles bursting with lemon and blueberry flavor. These are perfect for a guilt-free treat.
Ingredients
-
1 cup wild blueberries
-
1 cup walnuts
-
1 cup dates
-
3 tbsp gluten-free rolled oats
-
2 tbsp shredded coconut
-
1 tbsp chia seeds
-
1 lemon, juiced
-
1 cup cashews (soaked for about 30 minutes)
-
½ cup coconut oil, melted and cooled
-
3 tbsp raw honey
-
1 tsp vanilla extract
-
2-3 tbsp warm water (as needed to help blend)
Instructions
-
Step 1
Combine blueberries, walnuts, dates, rolled oats, shredded coconut, and chia seeds in a food processor. Process until a dough forms. -
Step 2
Add the juice of 1 lemon to the dough and process again until well combined. -
Step 3
Roll the dough into small balls and place them on a parchment-lined baking sheet. -
Step 4
For the frosting, combine soaked cashews, melted coconut oil, raw honey, vanilla extract, and the juice of 1 lemon in a high-speed blender. Blend until smooth and creamy, adding warm water 1 tablespoon at a time if needed to reach desired consistency. -
Step 5
Dip each truffle into the cashew frosting, ensuring it is fully coated. -
Step 6
Place the coated truffles back on the parchment-lined baking sheet and freeze for at least 30 minutes, or until firm.
Important Information
Nutrition Facts (Per Serving)
It is important to consider this information as approximate and not to use it as definitive health advice.
Allergy Information
Please check ingredients for potential allergens and consult a health professional if in doubt.